If you've opened GreenGo and stared at the bottom of the screen, you've seen it: a row of tabs that quietly holds six distinct audio tools. Most people find one or two they like and never click the rest. That's a shame, because each tab solves a specific problem in the DJ and producer workflow, and they're designed to work together.
This guide walks through every tab in the GreenGo music toolbar, what it does, when to use it, and how it connects to the others. By the end, you'll know exactly which tab to reach for at each stage of your library prep.
⚠ Use Responsibly — Copyright Matters
The Converter is designed for downloading and converting your own content, copyright-free material, or content you have permission to use. GreenGo does not support or encourage piracy or the unauthorized downloading of copyrighted material. With power comes responsibility — please respect creators' rights and applicable copyright laws in your jurisdiction.
What Is the Music Toolbar?
The music toolbar sits at the bottom of the GreenGo app window. It's a horizontal bar of buttons, each one switching the main content area to a different tool. Think of it like the ribbon in a productivity app, but for audio.
Here's what each tab does in one sentence:
- File Manager — Browse, organize, and send files to other tabs
- Highlights — Discover music via a YouTube feed that plays tracks at their most replayed moments
- Converter — Download and convert audio between formats (MP3, WAV, FLAC, M4A)
- Analyze — Detect BPM, musical key, Camelot code, energy, mood, and danceability
- Metadata — Edit ID3 tags: title, artist, album, BPM, key, cover art
- Stem Separation — Split any track into vocals, drums, bass, piano, guitar, and other
- SoundMap — Visualize your sample library on an interactive 2D feature map
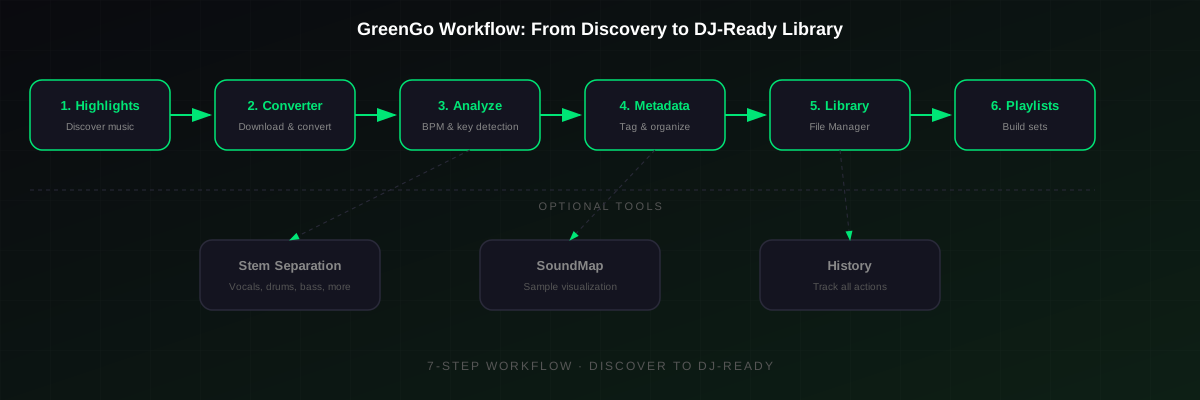
The tabs are ordered roughly in workflow order: you discover music (Highlights), grab it (Converter), analyze it (Analyze), tag it (Metadata), split it if needed (Stem Separation), and explore your sample library (SoundMap). File Manager is the connective tissue that lets you move files between tabs.
Each tab has its own deep-dive guide. This overview gives you the map; the individual posts give you the territory. Let's go through each one.
Tab 1: Stem Separation
The Stem Separation tab splits a finished, mixed track into its individual components. GreenGo uses Demucs (Meta's HTDemucs model) to separate audio into up to 6 stems: vocals, drums, bass, other, guitar, and piano.
When to use it: When you need an acapella for a mashup, a drum break for sampling, a bassline to study, or an instrumental for a remix.
How it works: You select an audio file, pick a stem count (2, 4, or 6), choose an output folder, and click Separate. The AI model processes the track and exports each stem as a separate WAV file.
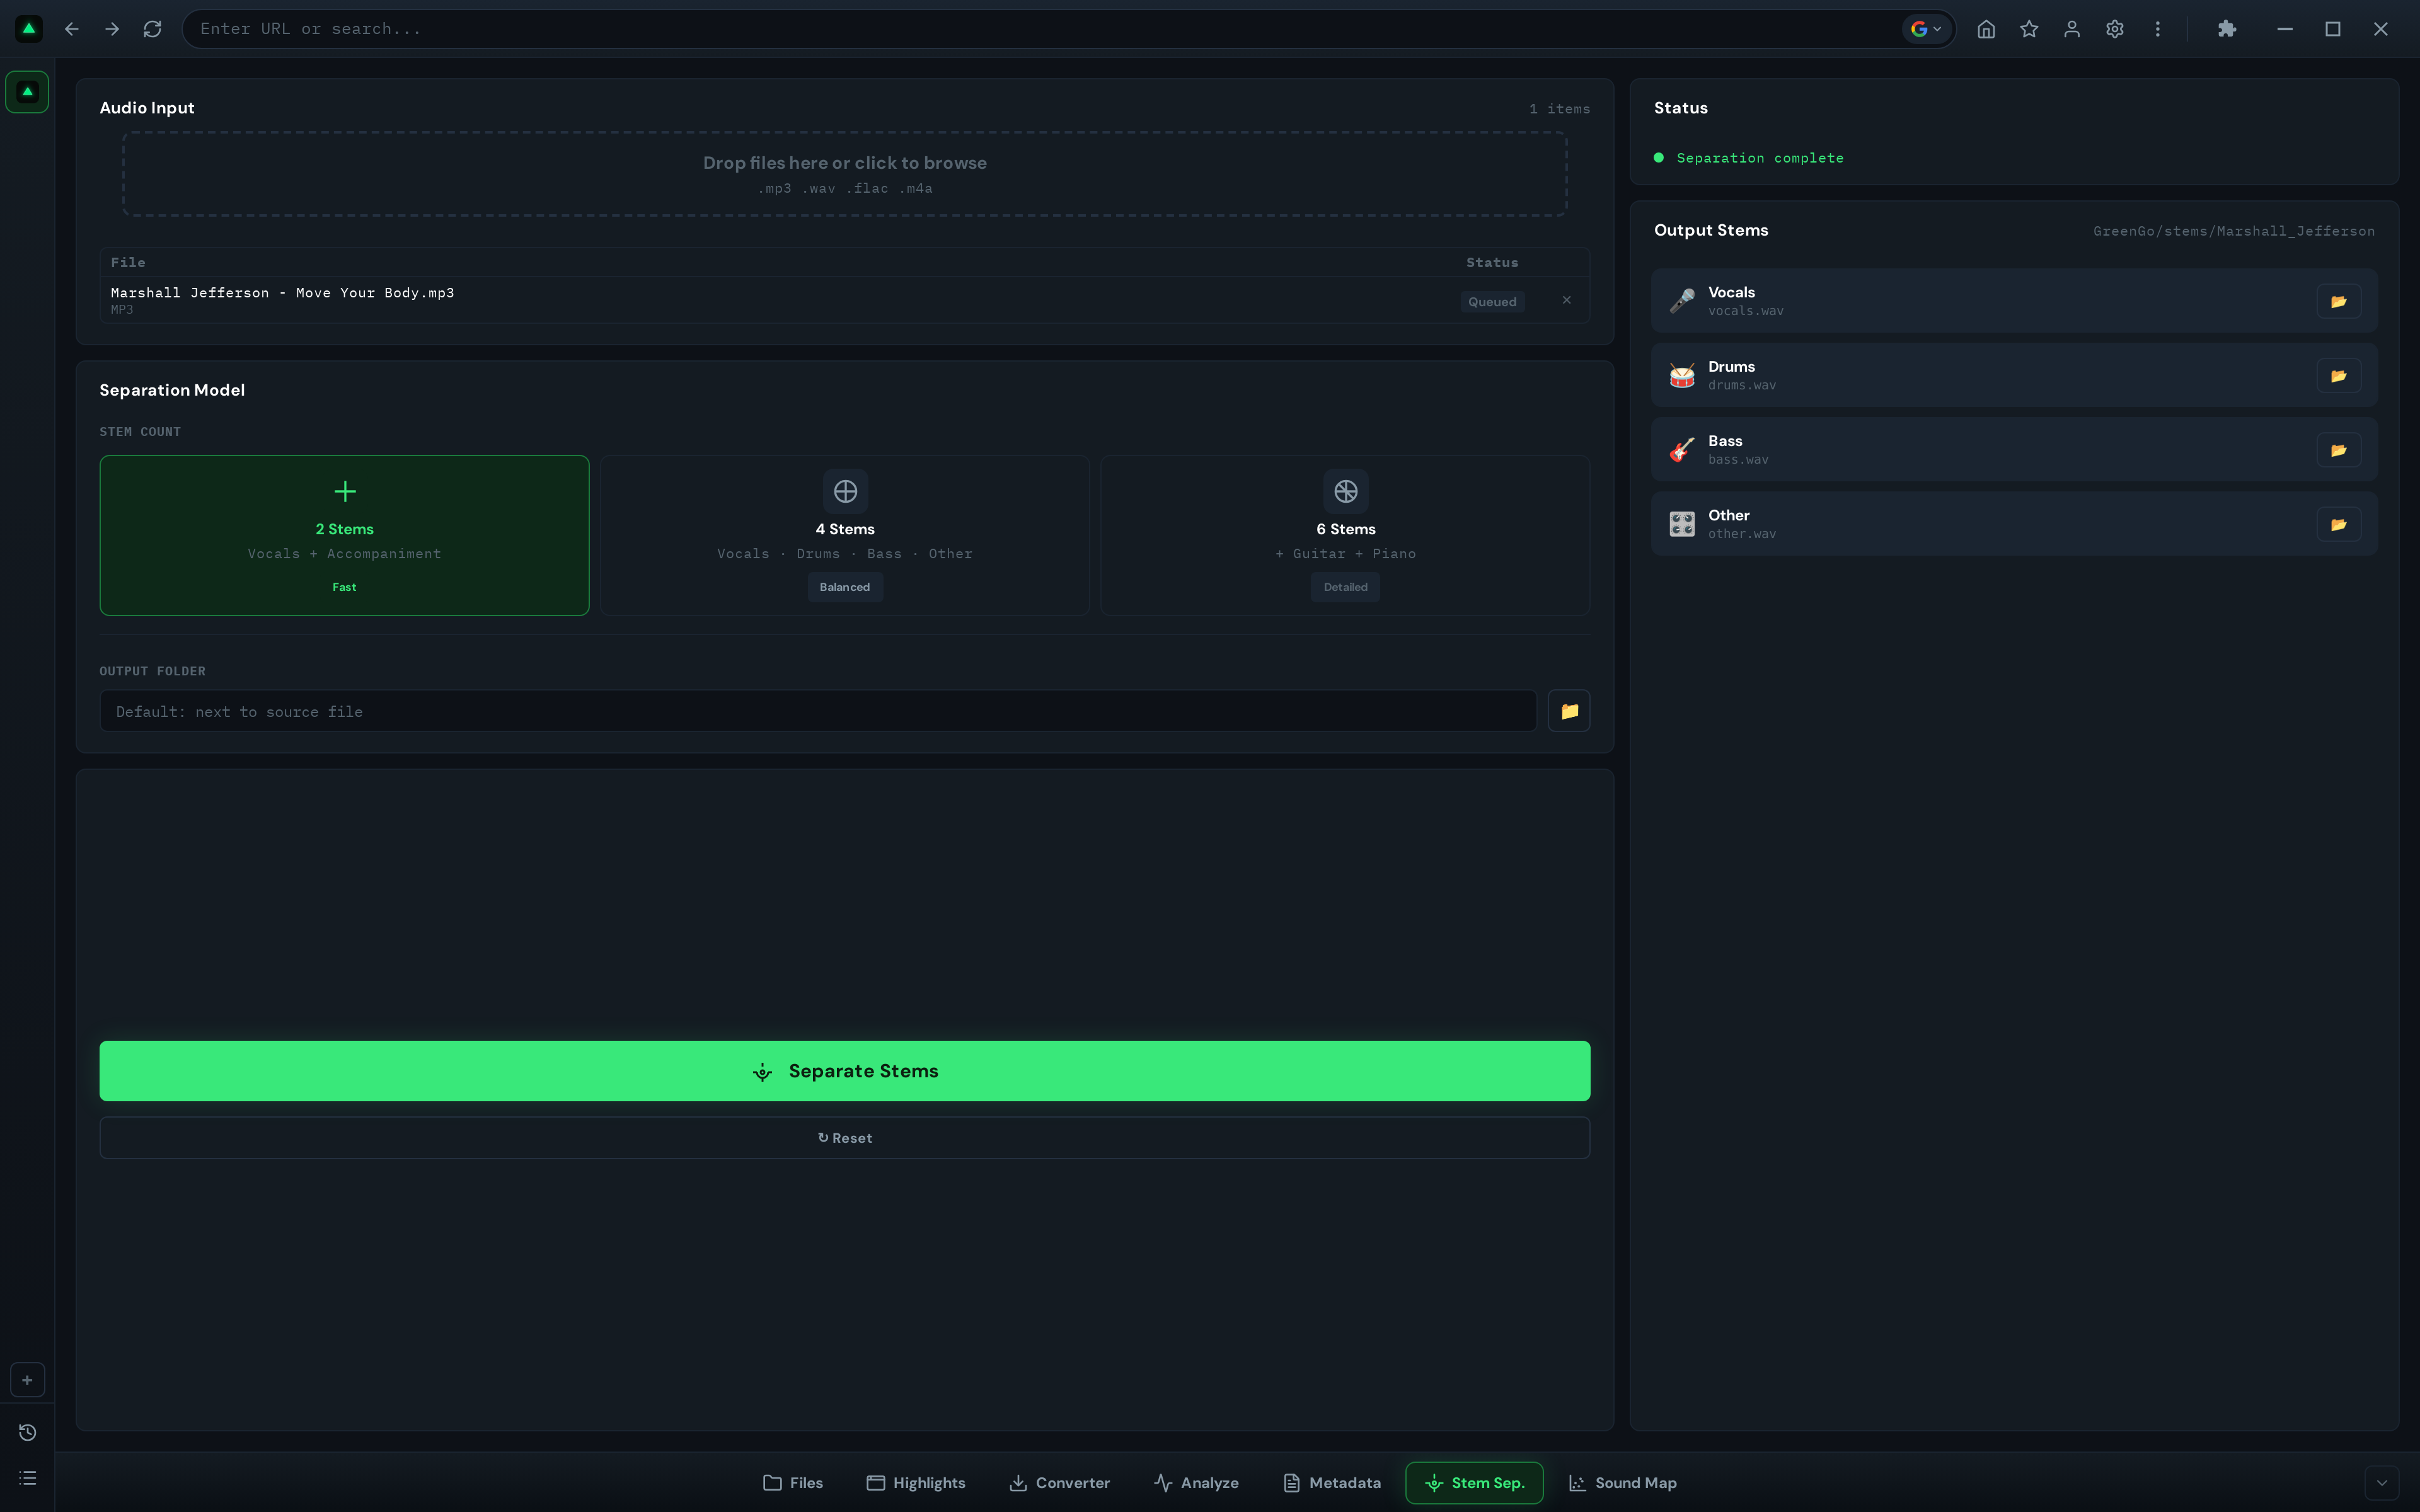
The three modes trade speed for detail:
- 2 Stems (Fast): Vocals + Accompaniment. Quick vocal isolation.
- 4 Stems (Balanced): Vocals, Drums, Bass, Other. Good for most remix work.
- 6 Stems (Detailed): Adds Guitar and Piano. Best for production and sampling.
Output is always WAV at 44.1kHz. Processing time depends on track length and your hardware, GPU acceleration is used automatically if available.
For the full tutorial, see our deep-dive guide to stem separation in GreenGo.
Tab 2: Analyze
The Analyze tab is the heart of DJ library prep. It detects BPM, musical key, Camelot wheel notation, energy level, mood, and danceability for any audio file. It also works automatically on tracks playing in the browser, so you can analyze music from YouTube or SoundCloud without leaving the app.
When to use it: Before every gig. Before importing into Rekordbox or Serato. Whenever you add new tracks to your library.
How it works: Import files (or point it at a folder), pick a genre if you want genre-aware key detection, and click one of the analysis buttons:
- Find All — Full analysis: BPM + Key + Vibe (energy, mood, danceability)
- Check BPM — BPM detection only
- Check Key — Key and Camelot detection only
- Check Vibe — Energy, mood, and danceability only
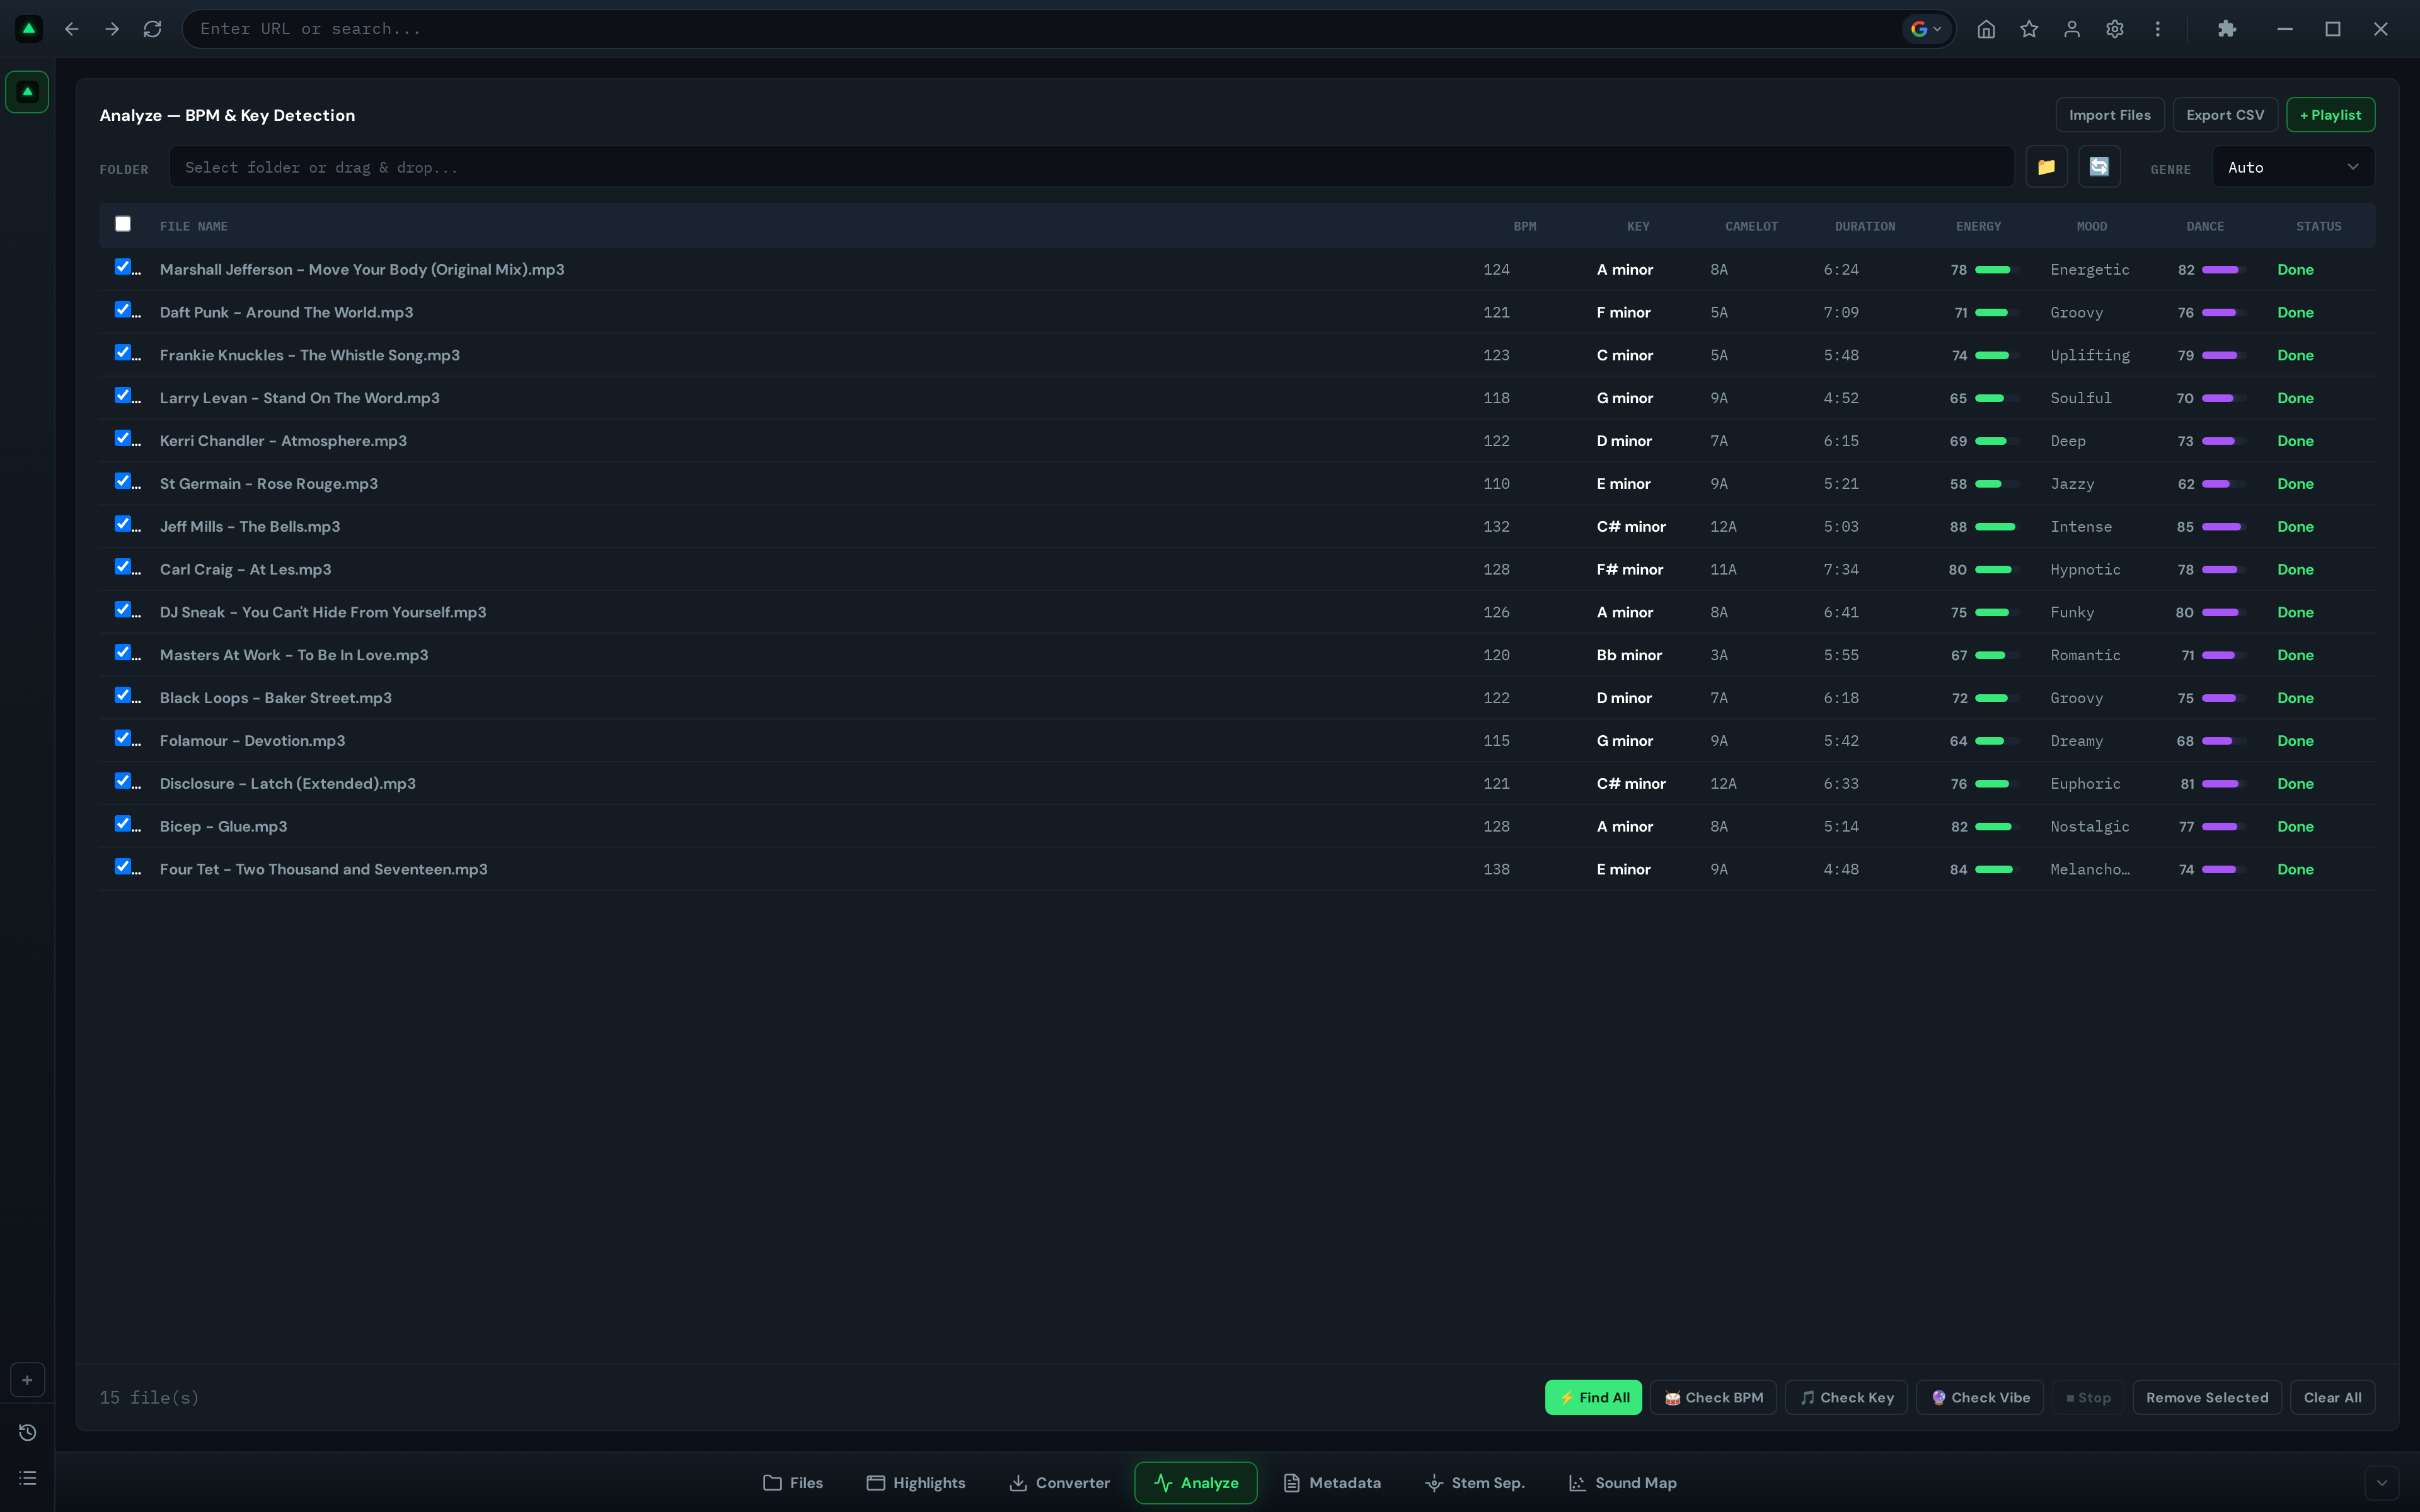
The results table shows everything at a glance: BPM (integer, snapped to common production tempos), Key (sharp notation like Am or F#), Camelot code (8A, 3B), Duration, Energy (0-100 progress bar), Mood (9 categories: Hyper, Dark, Melancholic, Intense, Neutral, Chill, Euphoric, Happy, Romantic), and Danceability (0-100).
Batch analysis runs with configurable concurrency (1-8 jobs). You can export results to CSV or send analyzed tracks directly to a playlist. If you've enabled auto-write in settings, BPM and key get written to the file's ID3 tags automatically, compatible with Rekordbox, Serato, Traktor, and VirtualDJ.
For the full tutorial, see our deep-dive guide to track analysis in GreenGo.
Tab 3: Metadata
The Metadata tab is a batch ID3 tag editor. It reads and writes tags for MP3 files and reads metadata from FLAC, M4A, OGG, WAV, AAC, and WMA. You can edit title, artist, album, year, genre, BPM, key, and cover art, and apply changes to multiple files at once.
When to use it: After analysis, before importing into DJ software. When your library has missing or incorrect tags. When you need to batch-add cover art.
How it works: Import files (or send them from File Manager), select one or more tracks in the sidebar, edit the form fields on the right, and click Save All. When multiple files are selected, fields show '(Multiple Values)' if they differ, and any edit applies to all selected files.
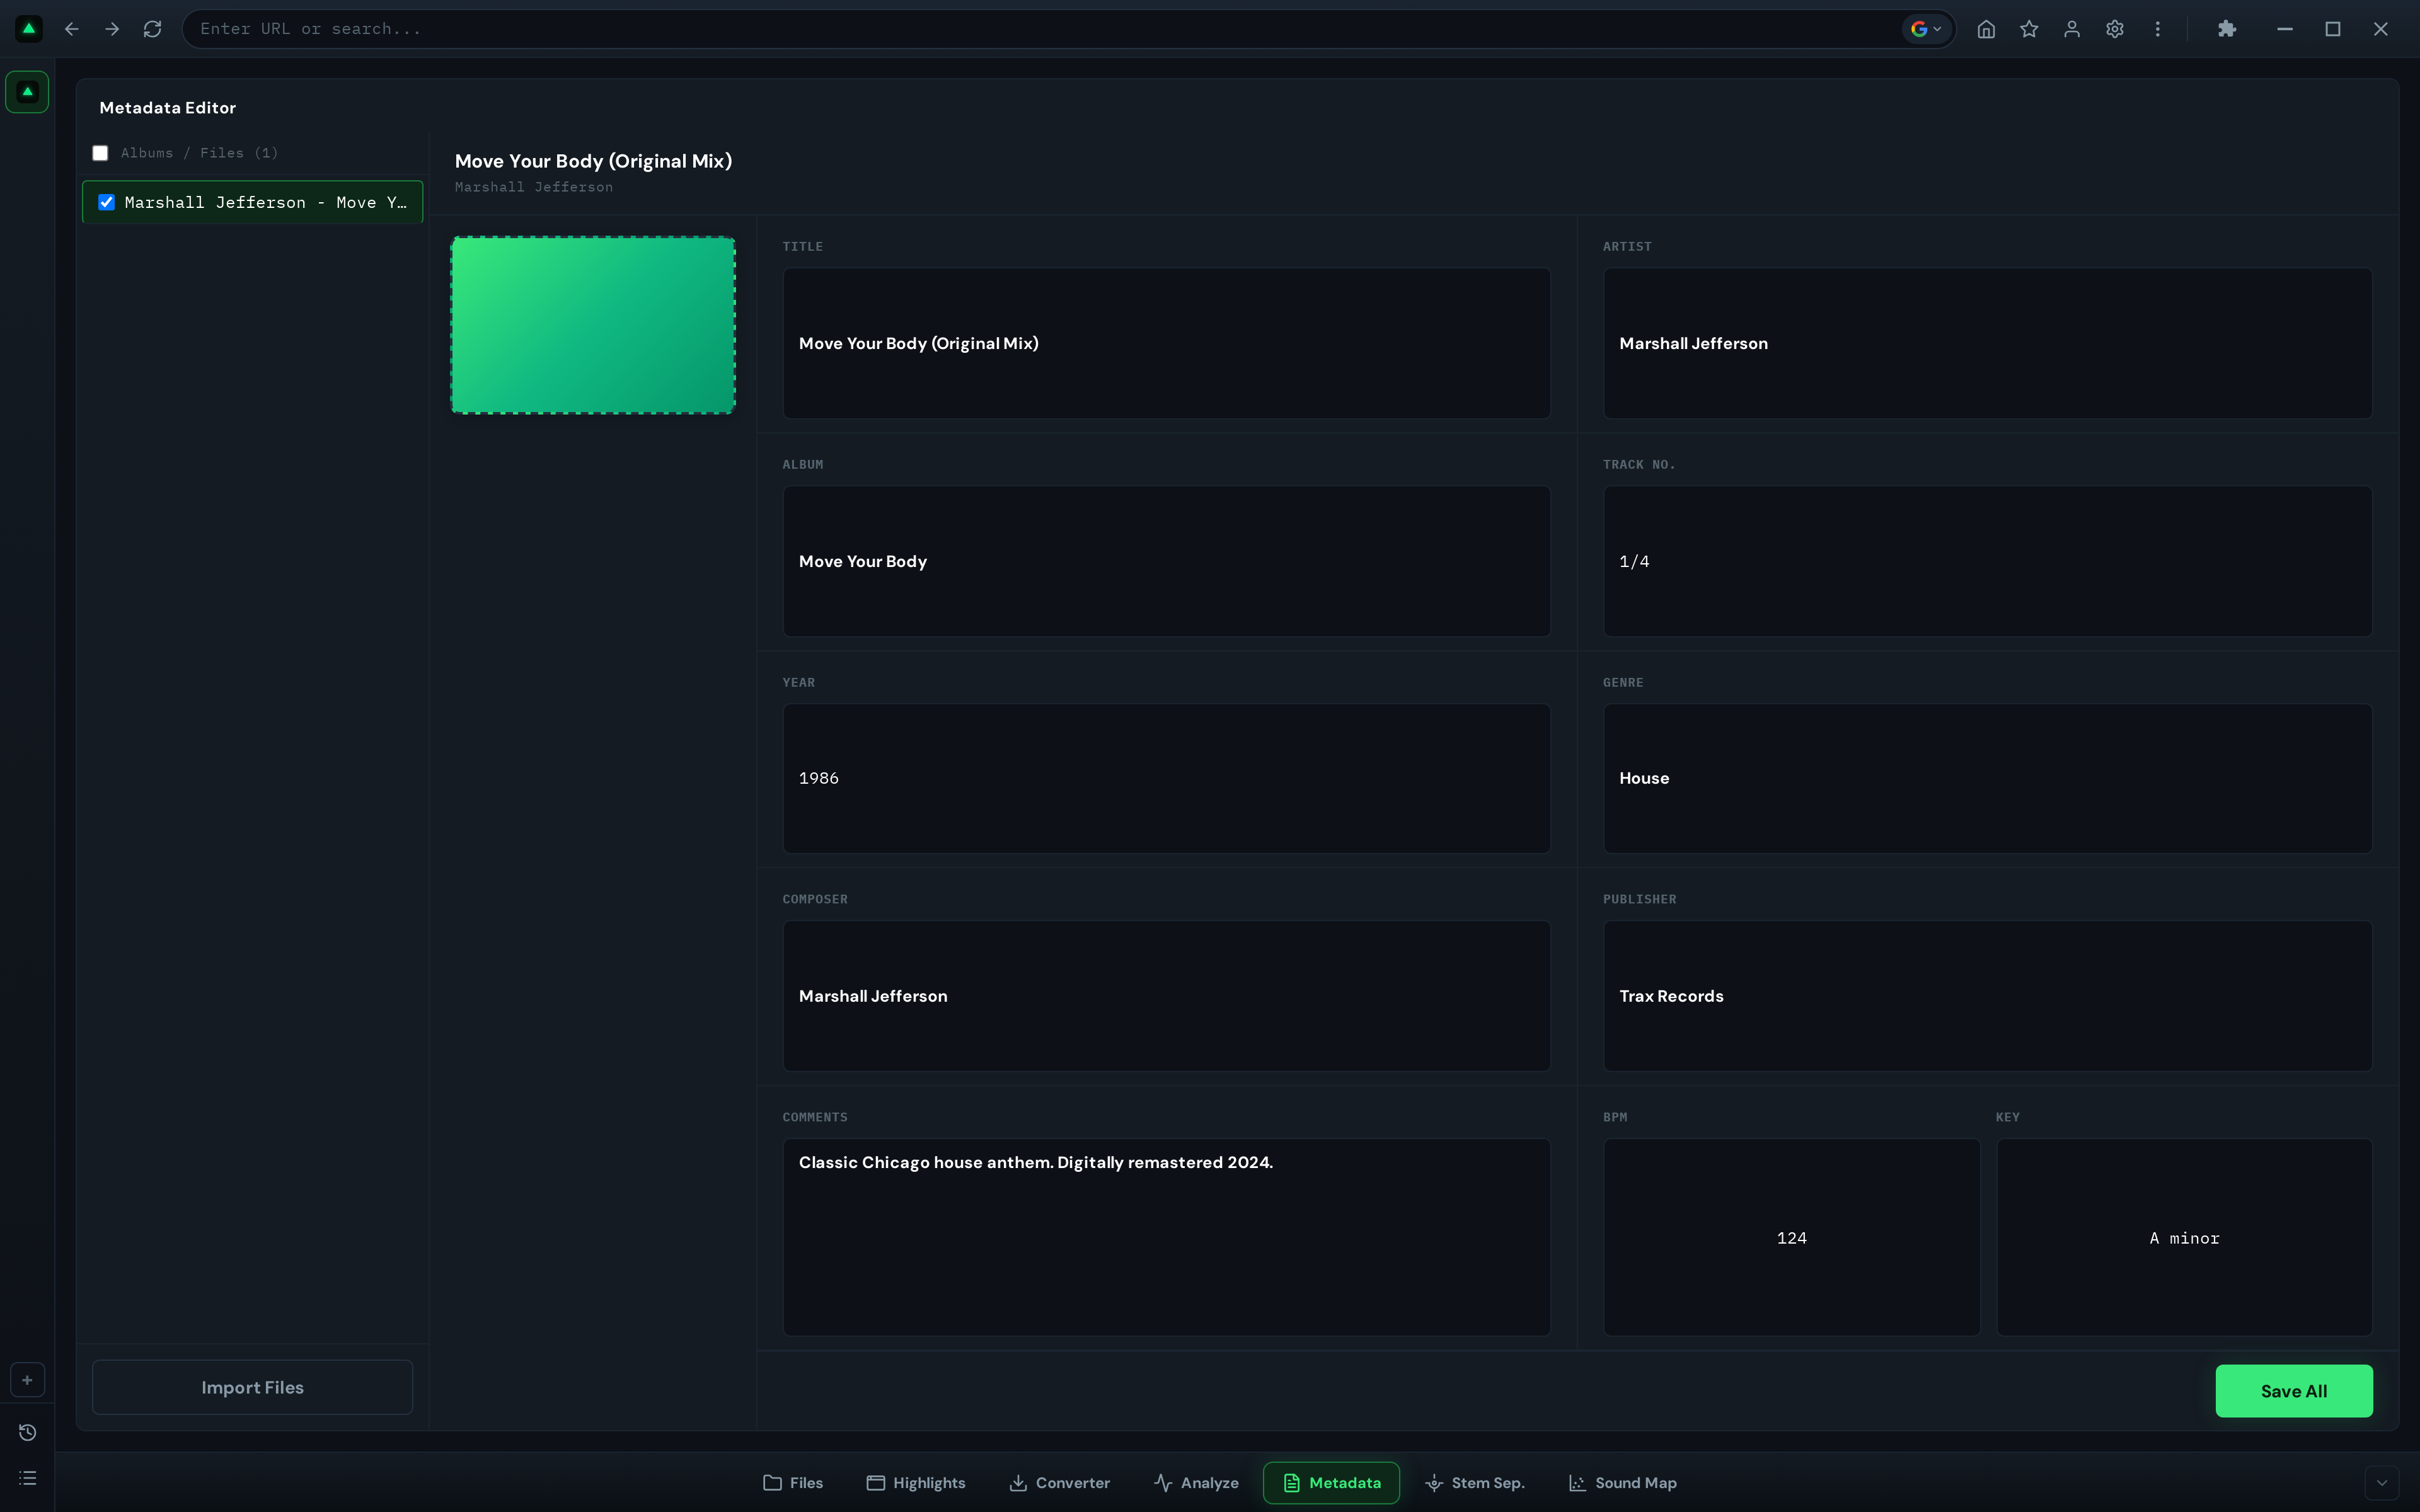
The cover art area is clickable, you can drop in a JPEG or PNG to replace the album art for all selected files. Changes auto-save when you switch tabs, so you don't lose work if you forget to click Save All.
For the full tutorial, see our deep-dive guide to metadata editing in GreenGo.
Tab 4: SoundMap
The SoundMap tab is an interactive 2D scatter plot that visualizes your sample library by audio features. It extracts 10 features from each file (brightness, energy, pitch, duration, zero crossings, spectral flux, MFCC 1, MFCC 2, roughness, noisiness) and plots them on a canvas you can zoom, pan, and click.
When to use it: When you're building a sample library and want to find similar sounds, identify duplicates, or explore your collection visually rather than by filename.
How it works: Click Open Folder, select a directory of audio files, and GreenGo scans and analyzes them. Each file becomes a dot on the scatter plot, positioned by the two features you select as axes (default: Brightness vs Energy). Hover for info, click to preview, and use the sample pool to collect favorites.
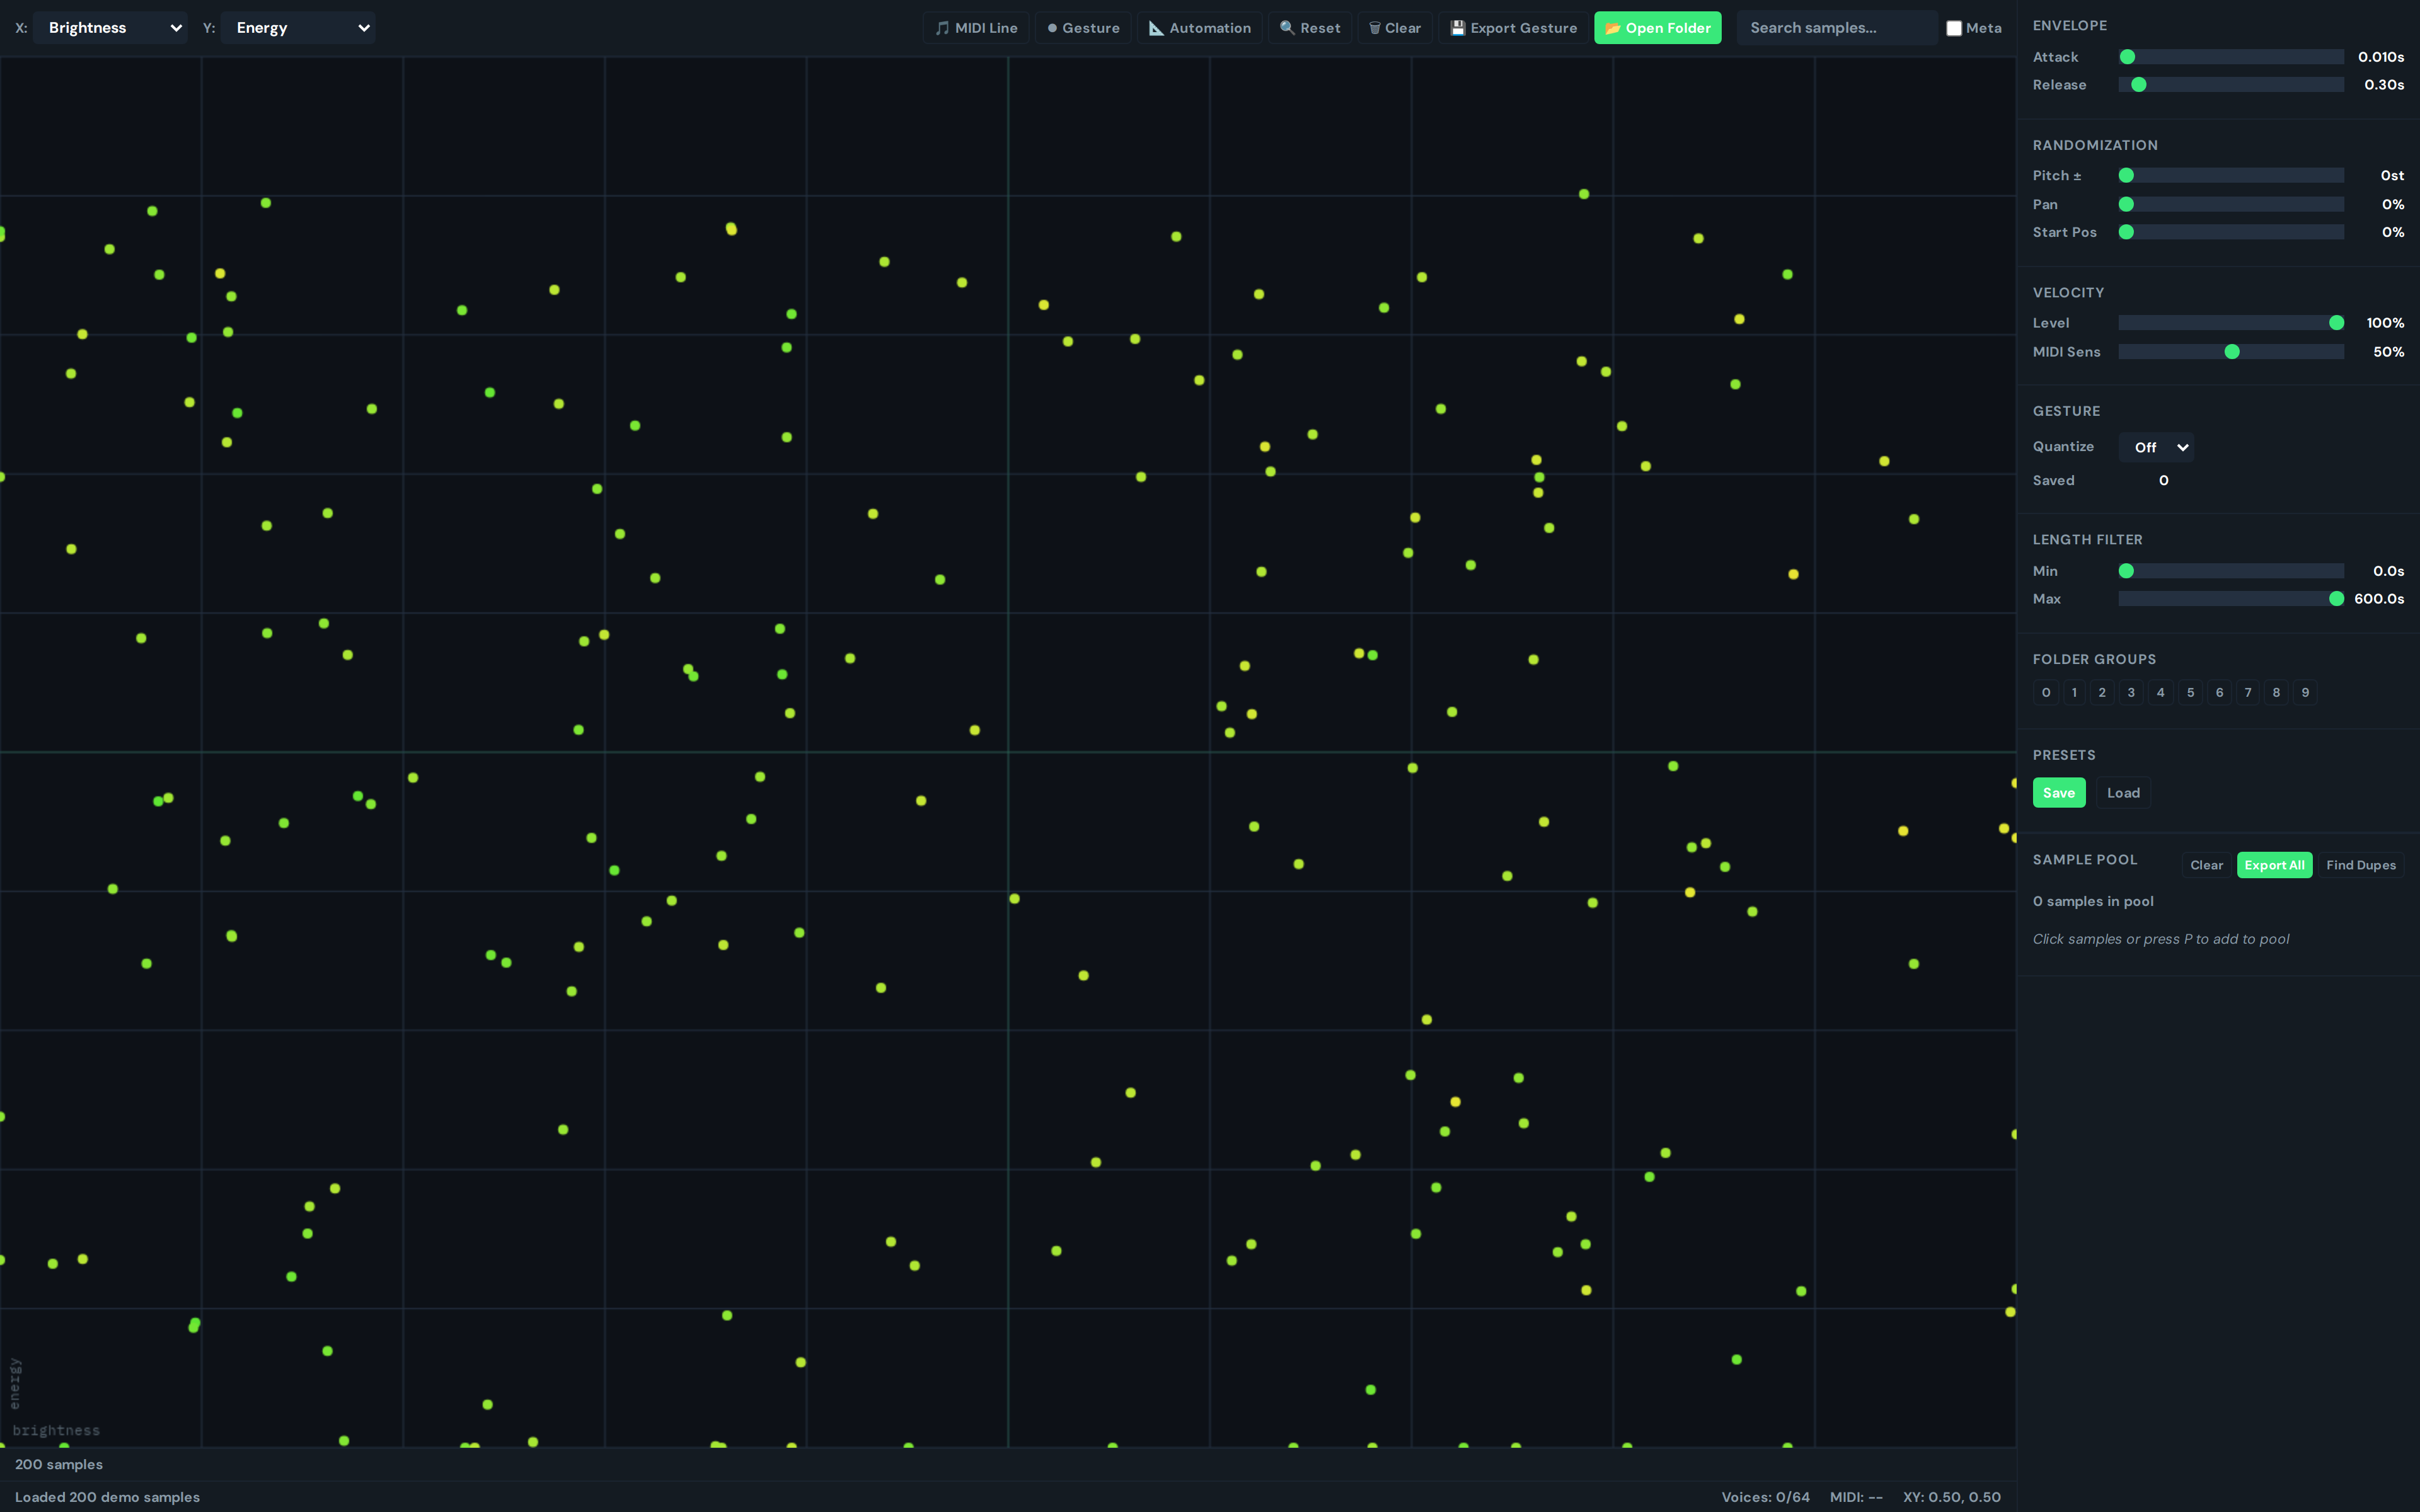
SoundMap also supports MIDI controllers, gesture recording (draw a path and export it as MIDI), and duplicate detection (finds both exact filename matches and timbral duplicates with similar features).
For the full tutorial, see our deep-dive guide to SoundMap in GreenGo.
Tab 5: Highlights
The Highlights tab is a music discovery tool. It creates a vertical feed of YouTube music videos, but instead of starting each video at the beginning, it seeks to the most replayed moment (the peak) using YouTube's 'Most Replayed' heatmap data.
When to use it: When you're looking for new music, killin' time between tasks, or want to preview tracks before downloading them.
How it works: Pick a genre chip (Trending, Pop, Hip-Hop, Electronic, R&B, Rock, Latin) or search for an artist/song. Videos load one at a time, each starting at its peak moment. Swipe or click Next to advance. The progress bar shows a heatmap of replay intensity, so you can see which parts of the track people replay most.
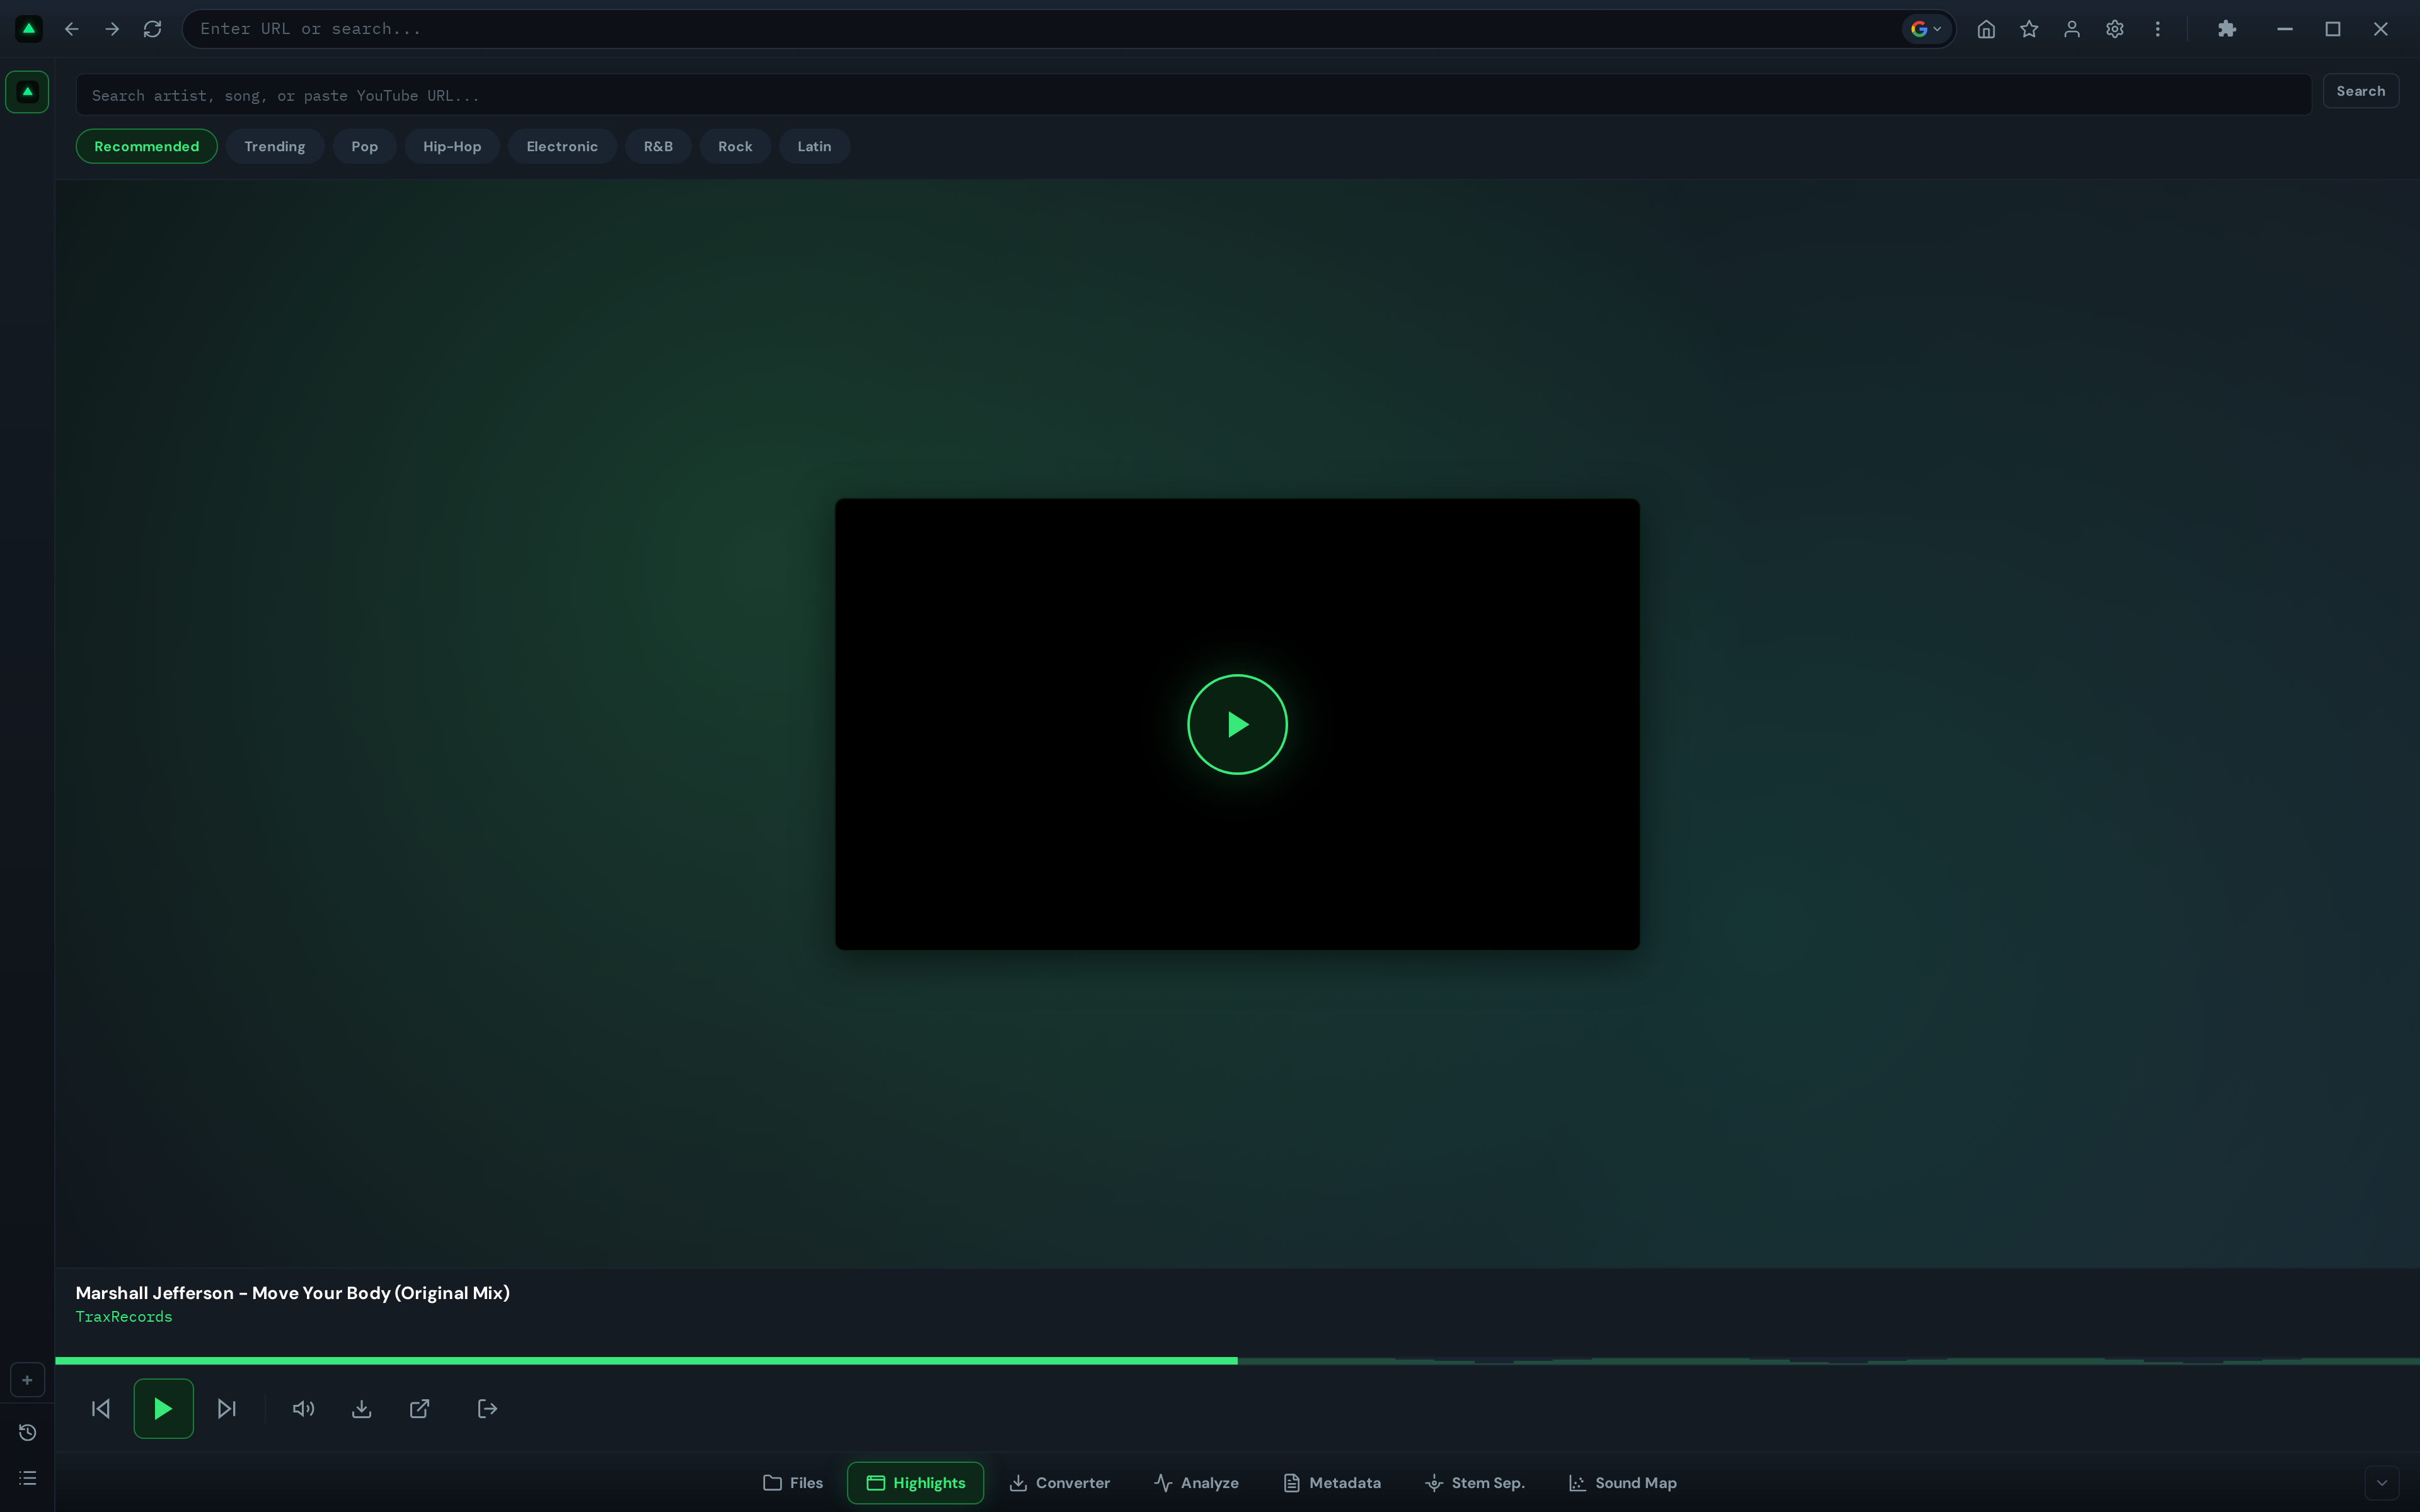
Found something you like? Click the Download button to send the video URL to the Converter tab, where you can download and convert it to MP3, WAV, or FLAC. You can also sign in to YouTube for personalized recommendations based on your listening history.
For the full tutorial, see our deep-dive guide to Highlights in GreenGo.
Tab 6: Converter
The Converter tab does two things: it downloads audio from URLs (YouTube, etc.) and converts local audio files between formats.
Note: Only download content you own, copyright-free material, or content you have permission to use. GreenGo does not support piracy. With power comes responsibility.
It supports batch processing of up to 30 URLs at once, plus drag-and-drop for local files.When to use it: When you need to download a track from YouTube. When you have FLAC files but your DJ software wants MP3. When you're converting a batch of files for a specific purpose.
How it works: Add items to the queue (paste URLs or drag files), choose your output format (MP3, WAV, FLAC, M4A), pick a bitrate (128-320 kbps), set a sample rate (44.1/48/96 kHz), and click Start Queue. The converter processes each item sequentially and shows real-time status.
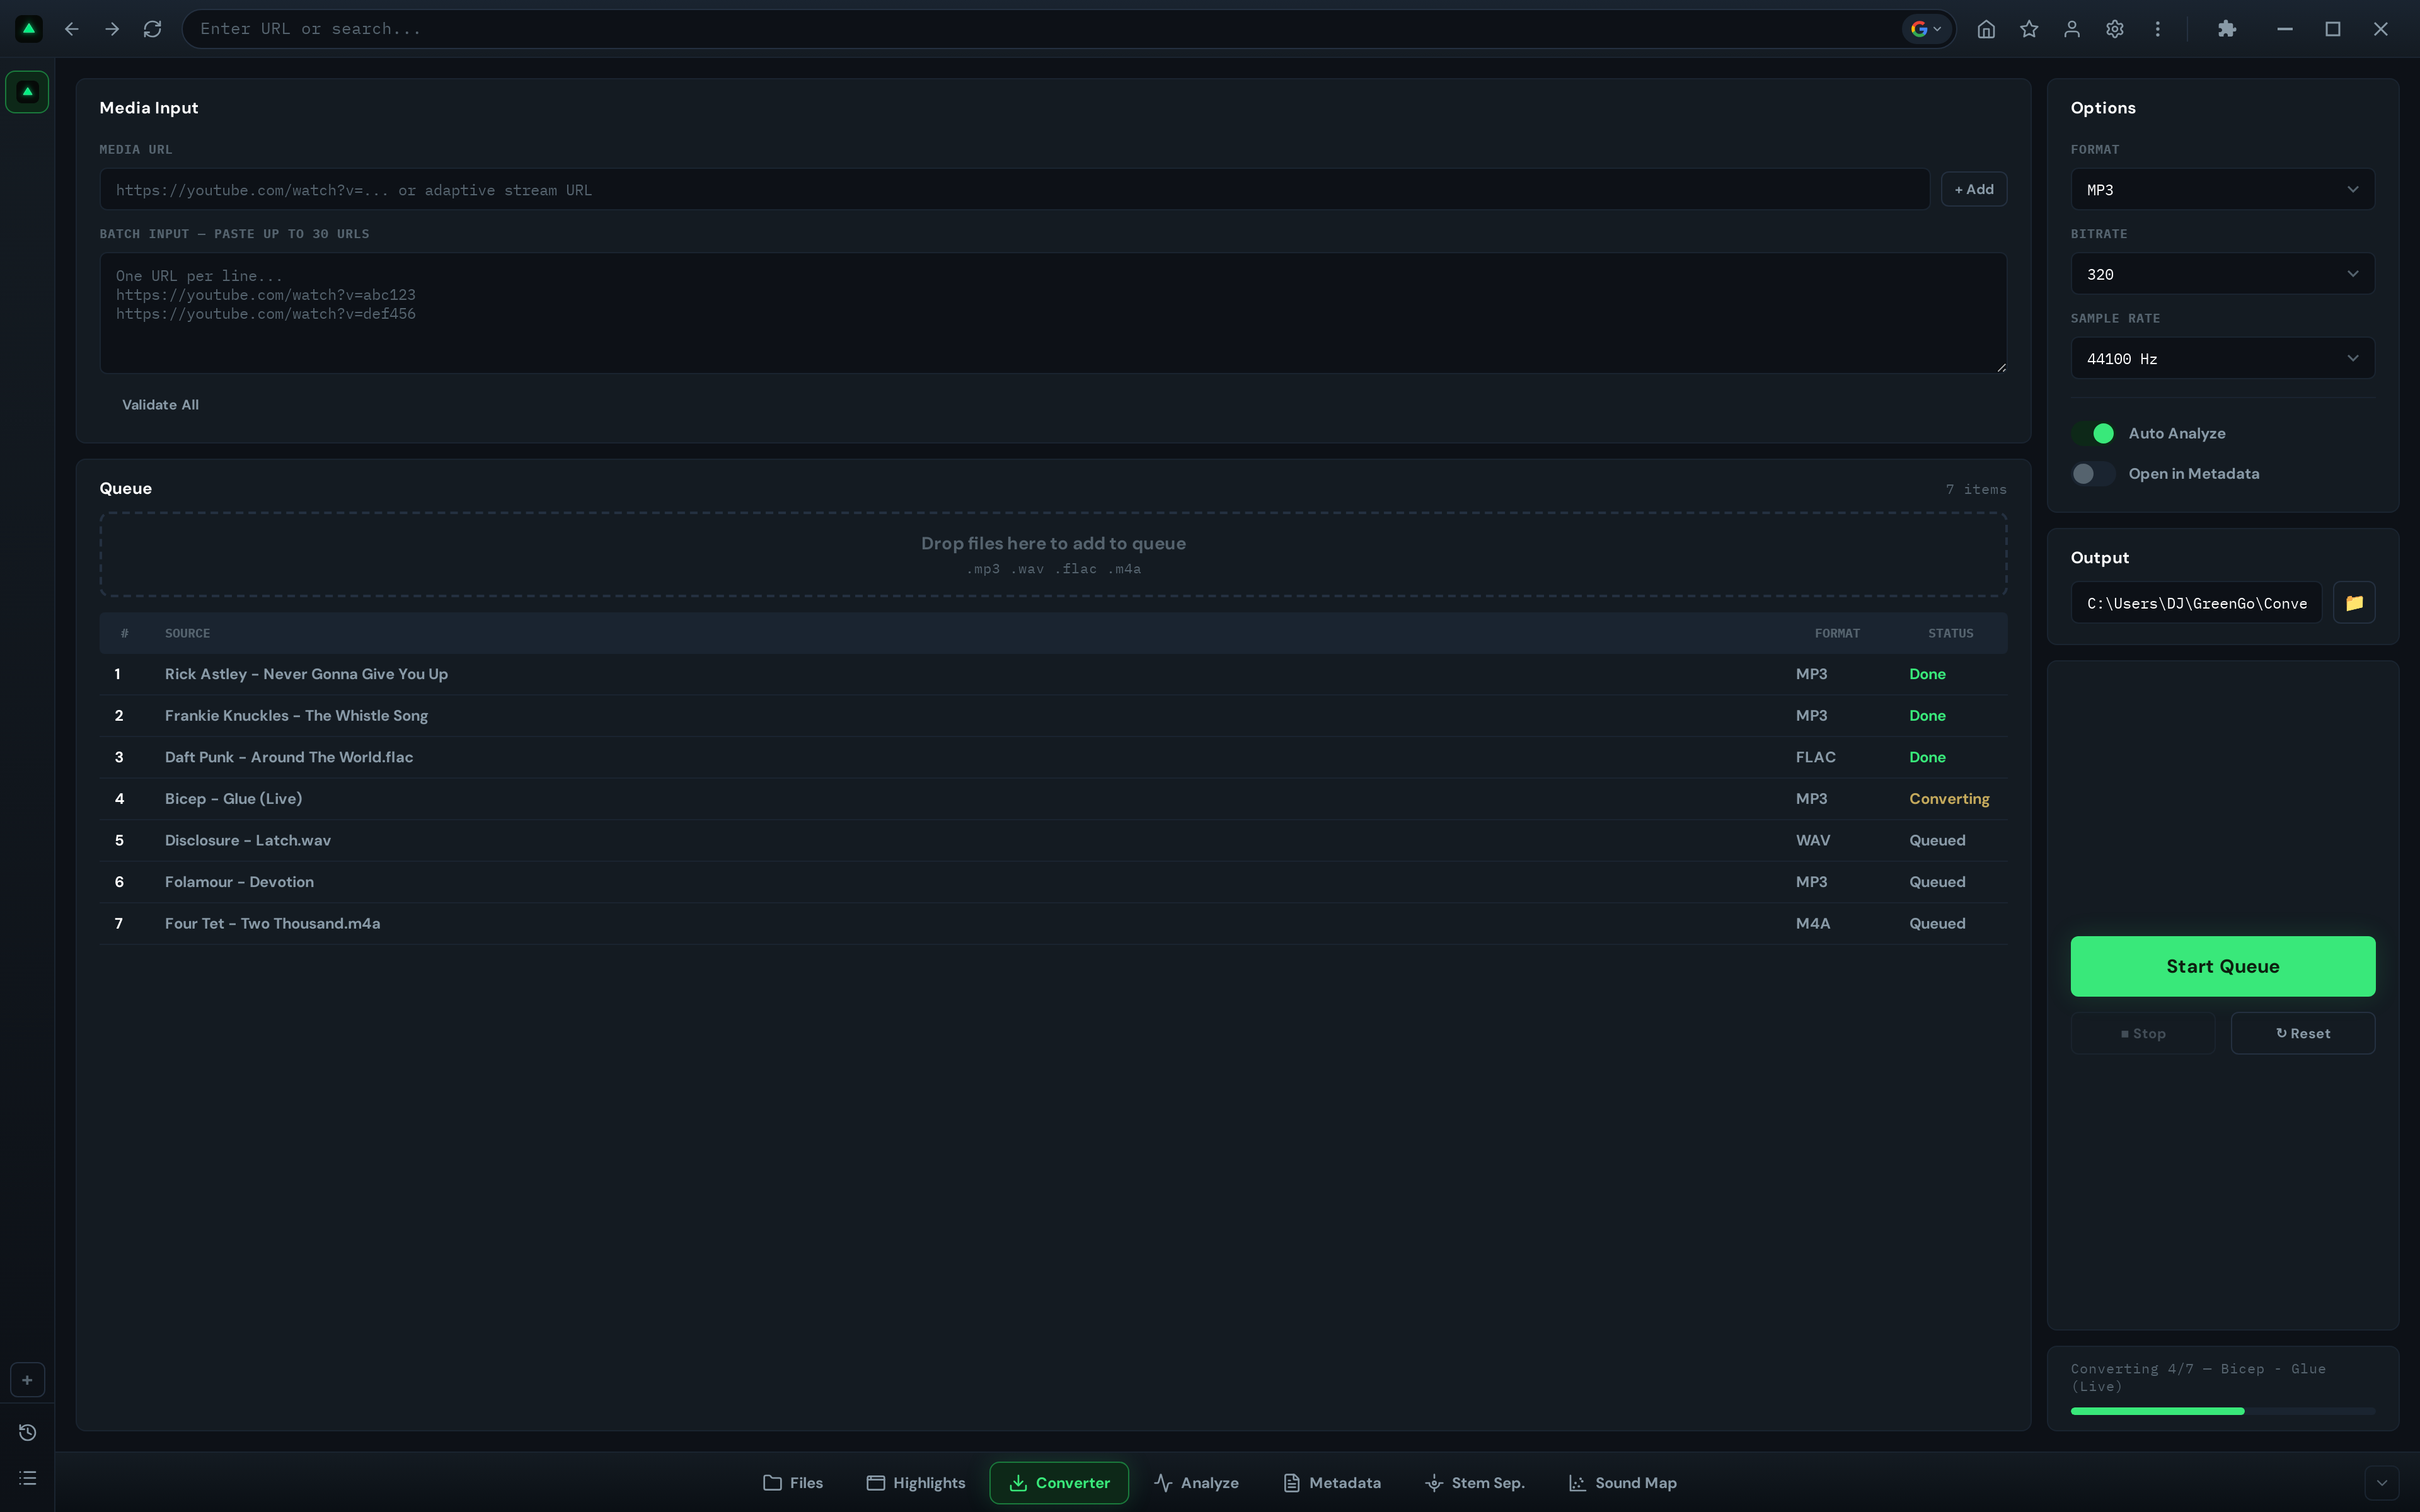
The Converter integrates with the rest of the app: if 'Auto Analyze' is checked, downloaded tracks get analyzed automatically. If 'Open in Metadata' is checked, they open in the Metadata tab for tagging. This is the fastest path from 'I found a track on YouTube' to 'It's analyzed, tagged, and ready in my DJ library.'
For the full tutorial, see our deep-dive guide to the Converter in GreenGo.
Putting It All Together: The GreenGo Workflow
The tabs aren't isolated tools, they're stages in a pipeline. Here's how a typical session flows:
- Discover — Open Highlights, browse by genre, find a track you like
- Capture — Click Download to send it to the Converter
- Convert — In Converter, pick MP3 320kbps, enable Auto Analyze, click Start Queue
- Analyze — The track appears in Analyze with BPM, key, and energy already filled in
- Tag — Open Metadata, fix the title and artist, add cover art, click Save All
- Separate (optional) — If you need stems, send the track to Stem Separation and pick 6-stem mode
- Explore (optional) — Add samples to SoundMap to see how they cluster with your existing library
That's the entire journey from discovery to DJ-ready, without leaving the app. No switching between five different tools, no manual file copying, no spreadsheet to track what's been analyzed.
GreenGo is subscription-based, runs on Windows and macOS, and works offline once installed. The free trial lets you try every feature with limits: 3 stem separations, 30 analyses, and 30 conversions. See pricing or download GreenGo to get started.
Frequently Asked Questions
Do I need internet to use GreenGo?
No. Once installed, all analysis, metadata editing, stem separation, and conversion of local files works offline. You only need internet for the Highlights tab (YouTube videos) and the Converter's URL download feature.
Can I use all tabs at the same time?
You switch between tabs by clicking them, but background processes continue. For example, you can start a stem separation job, switch to the Analyze tab, and the separation keeps running. You'll see the results when you switch back.
Which tab should I start with?
If you're prepping an existing library, start with Analyze. If you're discovering new music, start with Highlights. If you're organizing samples, start with SoundMap. The tabs are independent, you can use them in any order.
Does GreenGo write BPM and key to my files automatically?
Yes, if you enable 'Write ID3 metadata' in Settings. After analysis, BPM and key are written to the file's ID3 tags in formats compatible with Rekordbox, Serato, Traktor, and VirtualDJ. You can also write tags manually in the Metadata tab.
What's the difference between the free tier and the paid version?
The 7-day free trial (no credit card required) lets you analyze 30 tracks, separate 3 songs, and convert 30 files. After the trial, a subscription starting at $5.99/month removes all limits. See pricing details.
Can I send files between tabs?
Yes. The File Manager tab lets you send files to Metadata, Analyze, or Stem Separation with a single click. The Highlights tab can send video URLs to the Converter. The Converter can send downloaded files to Analyze and Metadata automatically.
Is it legal to download audio from YouTube?
Downloading audio from YouTube may violate YouTube's Terms of Service and copyright law, depending on the content and your jurisdiction. The Converter is intended for your own content, copyright-free material, or content you have explicit permission to download. GreenGo does not support piracy. With power comes responsibility — always respect copyright laws and creators' rights.