You can have the best mixing technique in the world, but if your library is a disorganized mess of untagged files with wrong BPM values and missing key information, you are mixing blindfolded. Track preparation is what separates DJs who improvise confidently from DJs who panic when the crowd shifts.
Every working DJ eventually builds a prep routine. Some do it manually with a pile of separate tools, spending hours before each gig. Others have automated the process down to minutes. This guide maps the entire workflow from raw audio files to a fully analyzed, tagged, and organized DJ library, ready to load into Rekordbox, Serato, Traktor, or VirtualDJ.
What Is DJ Track Preparation?
Track preparation is the process of getting your audio files performance-ready before they go into your DJ software. That means every file has the right format, correct BPM, accurate musical key, complete metadata tags, and a logical naming convention so you can find it at 1 AM when the dancefloor needs a tempo shift.
Think of it like a chef prepping ingredients before service. You chop the vegetables, measure the spices, and organize everything in containers so that when orders start coming in, you are executing, not scrambling. DJ track prep is the same principle: do the tedious work upfront so you can focus on reading the room during the set.
The problem most DJs run into is that track prep involves five different tasks, as any experienced DJ writing for Resident Advisor will tell you, and traditionally each one requires a different tool. You need a converter for format normalization, a BPM analyzer for tempo detection, a key finder for harmonic mixing, a metadata editor for tags, and a file manager for organization. Five tools, five workflows, five chances for something to go wrong.
The 5 Stages of Track Preparation
Every complete DJ track preparation workflow moves through five stages. Whether you are prepping 10 tracks for a warmup set or 200 for a festival, the stages do not change, only the scale does.
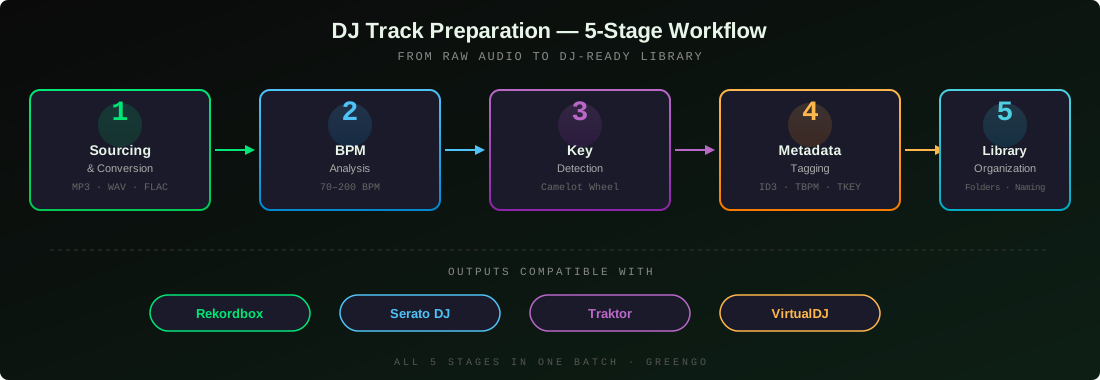
Here is what each stage covers and why skipping any of them creates problems downstream:
| Stage | What It Does | What Happens If You Skip It |
|---|---|---|
| 1. Sourcing & Conversion | Get tracks into a uniform audio format (MP3 320kbps, WAV, FLAC) | Inconsistent bitrates, incompatible formats, corrupted files mid-set |
| 2. BPM Analysis | Detect and write tempo to file metadata | Cannot sort by tempo, beat-matching becomes guesswork |
| 3. Key Detection | Identify musical key, write Camelot notation | Harmonic mixing impossible, clashing transitions |
| 4. Metadata Tagging | Write artist, title, genre, BPM, key to ID3 tags | DJ software shows wrong info, tracks unidentifiable in browser |
| 5. Organization | Folder structure, file naming, playlist grouping | Cannot find tracks live, duplicate files, bloated library |
Stage 1: Sourcing and Format Conversion
Before you can analyze anything, you need consistent audio files. DJs pull tracks from everywhere: purchased downloads from Beatport, promotional pools, tracks from Discogs for rare vinyl rips, cloud storage, web rips for quick edits, and files shared by producer friends. The result is usually a folder containing MP3s at 128kbps, WAVs at 1411kbps, M4A files from iTunes, and maybe a FLAC or two.
Mixed formats create two problems, a well-known issue discussed in Sound on Sound's audio engineering guides. First, some DJ software handles certain formats poorly. VirtualDJ, for example, can stutter with certain M4A encodings. Second, inconsistent bitrates mean some tracks are louder or quieter than others, which complicates gain staging during transitions.
The fix is simple: convert everything to one format. MP3 at 320kbps is the DJ standard because it is universally supported, small enough for USB sticks, and high enough quality that nobody on a club system will hear the difference. WAV is the alternative if you want lossless audio and have the storage budget.
If you are importing tracks from cloud sources, a tool that handles the download and conversion in one step saves enormous time. GreenGo's audio converter does exactly this: paste URLs, pick your format and quality, and it batch-converts everything to a uniform output. You can also import cloud audio into DJ software without ever touching a browser-based converter site.
For local files already on your drive, batch conversion is just as important. GreenGo handles local file conversion too, supporting MP3, WAV, AAC, FLAC, M4A, and OGG as both input and output formats. The key is processing everything in one batch rather than converting files one at a time.
Stage 2: BPM Analysis and Tempo Grouping
Once your files are in a consistent format, the next step is BPM detection. BPM is the foundation of DJ mixing because it determines which tracks can blend together. House sits around 120 to 130 BPM, techno pushes 130 to 150, hip-hop lives at 70 to 90, and drum and bass runs 160 to 180. Without accurate BPM values written to your files, you cannot sort your library by tempo, and you certainly cannot trust auto-beat-matching.
The challenge with BPM detection is that not all algorithms get it right. Half-time and double-time errors are the most common problems. A track at 140 BPM might get detected as 70 BPM if the algorithm locks onto the half-time feel. A track at 85 BPM might show as 170 BPM if it picks up on a fast percussion layer. We have written extensively about this in our guide on how to find the BPM of any song, comparing five different detection methods.
GreenGo's BPM analyzer runs seven detection methods in parallel, including IOI histogram analysis, beat tracking with intervals, PLP analysis, tempogram peaks, and autocorrelation. Each method produces a candidate tempo with a weight based on its reliability. The system then finds a weighted consensus and verifies it against phase coherence in the audio signal. This multi-method approach catches half-time errors that single-method analyzers miss.
What matters for your prep workflow is that the BPM value gets written directly to the file's metadata. GreenGo writes the TBPM ID3 frame for MP3s, the tmpo atom for M4A files, and BPM Vorbis comments for FLAC and OGG. When you import those files into Rekordbox or Serato, the BPM is already there. No re-analysis needed.
Stage 3: Key Detection and Harmonic Mixing Prep
BPM tells you when two tracks can mix. Key tells you whether they will sound good together. Harmonic mixing, the practice of transitioning between tracks in compatible keys, is what makes a set feel musical rather than just a sequence of beat-matched songs. As Mixmag has noted in their harmonic mixing guides, understanding key relationships transforms good DJs into great ones.
The Camelot wheel is the standard tool for harmonic mixing. It maps all 24 keys (12 major, 12 minor) to a numbered notation where compatible keys share numbers. For example, 8A (A minor) mixes cleanly into 8B (C major), 7A (F minor), or 9A (E minor). You can read more about this in our guide to key lock and harmonic mixing.
Key detection works by extracting chroma features from the harmonic content of a track and correlating them against key profiles. GreenGo uses the Krumhansl-Kessler, Temperley, and Aarden-Essen key profiles, with dual chroma analysis that separates bass frequencies for root note detection from full-spectrum chroma for harmonic content. The result is a key call like A minor plus its Camelot notation 8A, both written to the file's metadata.
For DJs who want to mix harmonically, having the key and Camelot notation written to every file means your DJ software can display and sort by key. Rekordbox reads the TKEY and TXXX:INITIALKEY frames. Traktor reads TXXX:OPENKEY. Serato and VirtualDJ both read the standard key fields. GreenGo writes all of these in one pass, so every major DJ platform picks up the key information automatically. Our song key finder guide covers this in more depth.
Stage 4: Metadata Tagging for DJ Software
Metadata is the information embedded in an audio file that tells your DJ software what it is looking at. Artist name, track title, genre, BPM, key, album, year, and artwork all live in ID3 tags (for MP3), MP4 atoms (for M4A), or Vorbis comments (for FLAC/OGG). When metadata is missing or wrong, your DJ browser shows Unknown Artist and blank fields, making it impossible to find tracks during a set.
The most critical tags for DJs are BPM, key, artist, and title. Genre is important for open-format DJs who need to filter by style. Artwork helps with visual identification in browser views. We cover the technical details of ID3 tags in our guide on why every DJ needs ID3 metadata tagged correctly.
The problem with manual tagging is scale. If you are prepping 50 tracks, manually editing metadata for each one takes hours. Batch metadata tools solve this, and GreenGo includes a full batch audio tagger that writes all DJ-compatible metadata in one pass. For tracks sourced from supported platforms, GreenGo automatically parses the page title to extract artist and title, then writes them to the correct tags.
What makes metadata tagging tricky is DJ software compatibility. Rekordbox, Serato, Traktor, and VirtualDJ each read slightly different tag fields. GreenGo writes to all of them simultaneously: TBPM for BPM, TKEY for musical key, TXXX:INITIALKEY for Camelot notation (Rekordbox, VirtualDJ, Serato), TXXX:OPENKEY for Open Key notation (Traktor), TPE1 for artist, TIT2 for title, and COMM for comments. One write operation covers every major DJ platform.
Stage 5: Library Organization and File Naming
You have converted, analyzed, and tagged your tracks. Now they need to live somewhere logical. Library organization is the final stage of track prep, and it is the one most DJs neglect until their collection hits 5,000 files and becomes unnavigable.
A good DJ library structure has two layers: folder organization and file naming. Folders should group tracks by purpose, not just by genre. Common folder structures include organizing by genre and BPM range (e.g., House 120-128, House 128-135), by gig type (Wedding Sets, Club Sets, Warmup), or by energy level (Openers, Peak Time, Cool Down).
File naming is equally important. A consistent naming convention means you can identify a track at a glance, even in a flat folder view. The standard format is: BPM - Key - Artist - Title. For example: 128 - 8A - Daft Punk - One More Time.mp3. This puts the most useful mixing information right in the filename.
If you produce music or work with loops and samples, the same organization principles apply. Our guide on how to sort loops by BPM covers the studio side of tempo-based organization.
How to Prep Tracks with GreenGo
GreenGo combines all five stages into a single desktop workflow. Here is the step-by-step process for preparing a batch of tracks from raw files to DJ-ready library entries:
- Import your tracks. Drag and drop local files into GreenGo's converter tab, or paste URLs for cloud-sourced tracks. You can mix local files and URLs in the same batch.
- Set your output format. Choose MP3 320kbps for USB-based DJing or WAV for lossless quality. Pick your output folder where you want the processed files to land.
- Enable auto-analysis. Check the Auto Analyze option. This tells GreenGo to run BPM and key detection on every file after conversion, automatically.
- Start the batch. Hit convert. GreenGo processes files concurrently (you can set the number of parallel workers up to 8). Each file gets converted, BPM-detected, key-analyzed, and metadata-tagged in sequence.
- Review results in the Analyze tab. Every processed file appears in the analysis table with its BPM, musical key, and Camelot notation displayed. You can spot-check values and re-run detection on any file that looks wrong.
- Edit metadata if needed. Open the Metadata tab to review and edit artist, title, genre, and artwork for any track. GreenGo's split-pane editor shows all fields with inline validation.
- Export to your DJ software. Copy the processed files to your Rekordbox, Serato, Traktor, or VirtualDJ library folder. All metadata is already embedded, so your DJ software reads it on import.
The entire process runs locally on your Windows or Mac desktop. No internet connection required for processing, no cloud uploads. The free tier lets you process 3 songs to test the workflow, and the full version is a $5.99/month subscription with a 7-day free trial (no credit card required). You can compare this approach to other tools in our GreenGo vs Mixed In Key comparison.
Cue Point Strategy: Setting Markers That Actually Help
Cue points are bookmarks you set within a track to jump to specific sections instantly. Most DJ software supports 8 cue points per track. The question is: where should you put them?
There is no single right answer, but there are strategies that work better than randomly dropping markers. Here is a cue point framework that many working DJs use:
- Cue 1 (red): Track intro, first beat. Your default load point.
- Cue 2 (orange): First breakdown or drop. Where the energy shifts.
- Cue 3 (yellow): Vocal entry. Useful for mixing in over an instrumental.
- Cue 4 (green): Mix-out point. Typically 32 bars before the end, where you start transitioning to the next track.
- Cue 5 (blue): Loop section. A 4 or 8 bar section that loops cleanly for extending transitions.
- Cue 6 (cyan): Second drop or peak energy moment.
- Cue 7 (purple): Breakdown 2 or bridge. For creative mid-set jumps.
- Cue 8 (pink): Outro or final mix-out point. The last place you can cleanly exit.
Cue points are set inside your DJ software (Rekordbox, Serato, Traktor), not in GreenGo. But having accurate BPM and key data before you start setting cues makes the process faster. You know the tempo and harmonic context of each track, so you can plan your cue strategy around where transitions will land musically. For more on building efficient prep routines, check our guide on 5 time-saving DJ workflows.
Manual vs Automated Track Prep
Let's be honest about what manual track prep actually looks like. You open a converter app, convert your files. You open a BPM analyzer, drag files in, wait, copy BPM values. You open a key detector, drag the same files in again, wait, copy key values. You open a tag editor, paste in BPM and key for each file individually. You rename files by hand. For 50 tracks, this is 2 to 3 hours of repetitive work.
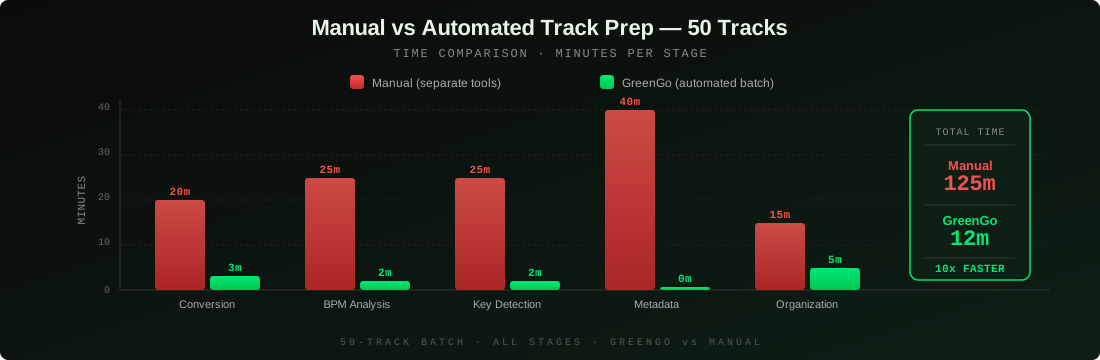
Automated prep collapses all of that into a single batch operation. Here is how the time breaks down for a 50-track batch:
| Stage | Manual Time | GreenGo Time |
|---|---|---|
| Format conversion | 20 min | 3 min (batch, parallel) |
| BPM detection | 25 min | 2 min (auto after conversion) |
| Key detection | 25 min | 2 min (auto after conversion) |
| Metadata tagging | 40 min | 0 min (automatic) |
| File renaming | 15 min | 5 min (review and organize) |
| Total | ~125 min | ~12 min |
The difference is not just speed. Automated prep also eliminates human error. No copy-paste mistakes with BPM values, no forgotten key tags, no files that slip through without metadata. Every file gets the same treatment, every time. For DJs prepping open-format sets across multiple genres, this consistency matters even more because you are dealing with tracks at wildly different tempos and keys.
Tips for Faster Track Preparation
- Batch everything. Never process tracks one at a time. Whether converting, analyzing, or tagging, batch operations are 10x faster than sequential processing.
- Use consistent formats. Standardize on MP3 320kbps for club play or WAV for festivals. Mixed formats cause software hiccups and inconsistent volume levels.
- Write metadata during analysis. Do not separate analysis and tagging into different steps. Tools that write BPM and key to files during detection save an entire workflow stage.
- Verify half-time BPM values. If a house track shows 65 BPM, it is probably 130 BPM. If a hip-hop track shows 170 BPM, it is probably 85 BPM. Always sanity-check against genre norms.
- Name files with mixing info. Put BPM and Camelot key in the filename:
128 - 8A - Artist - Title.mp3. You can identify mix-compatible tracks without opening your DJ software. - Organize by energy, not just genre. A 128 BPM house track and a 128 BPM techno track serve different purposes. Group by energy level (opener, peak, cooldown) within your genre folders.
- Prep before you need to. Do not wait until the night before a gig. Process new tracks as you acquire them so your library is always gig-ready. A weekly 15-minute prep session beats a 3-hour panic session.
- Use stem separation for creative prep. GreenGo's 6-stem separation lets you create instrumental versions, acapellas, and drum-only edits for more flexible mixing options during your set. To understand the AI behind it, read our guide to how stem separation works.
Frequently Asked Questions
How do I prep songs for DJing?
Start by converting all tracks to a consistent format (MP3 320kbps is standard). Then run BPM detection and key analysis on each file, writing the results to metadata tags. Fill in artist, title, and genre tags. Finally, organize files into logical folders with a consistent naming convention like BPM - Key - Artist - Title. Tools like GreenGo automate all of these steps in a single batch operation.
What metadata does DJ software need?
DJ software primarily reads BPM (TBPM tag), musical key (TKEY tag), Camelot notation (TXXX:INITIALKEY for Rekordbox, Serato, VirtualDJ; TXXX:OPENKEY for Traktor), artist (TPE1), and title (TIT2). Genre (TCON) and artwork are secondary but helpful for library browsing. GreenGo writes all of these in formats compatible with Rekordbox, Serato, Traktor, and VirtualDJ simultaneously.
Do I need to analyze tracks in Rekordbox if I already tagged them?
If BPM and key are already written to the file's metadata tags, Rekordbox will read them on import without needing to re-analyze. This saves significant time with large libraries. However, Rekordbox may still run its own analysis for waveform generation and beatgrid calculation. The key point is that your BPM and key values will be correct from the start, so Rekordbox's analysis becomes faster and more accurate.
What is the best BPM analyzer for DJ track preparation?
The best BPM analyzer is one that uses multiple detection methods and writes results directly to file metadata. Single-method analyzers are prone to half-time and double-time errors. GreenGo uses seven parallel detection methods with weighted consensus and phase coherence verification, achieving accuracy that single-method tools cannot match. You can read our detailed comparison in how to detect the BPM of any song.
How long does it take to prep tracks for a DJ set?
Manual track preparation for a 50-track set typically takes 2 to 3 hours using separate tools for conversion, BPM detection, key analysis, and tagging. With an automated tool like GreenGo, the same 50 tracks can be fully prepped in 10 to 15 minutes because all stages run in a single batch with concurrent processing. The time savings scale with library size.
Can I use GreenGo for free to prepare DJ tracks?
Yes. GreenGo's free tier lets you process 3 songs, which is enough to test the full workflow: conversion, BPM detection, key analysis, and metadata tagging. The full version is a $5.99/month subscription with a 7-day free trial (no credit card required). It runs locally on Windows and macOS, so no internet connection is needed after installation. See the pricing page for details.
Track preparation is not the most exciting part of DJing, but it is the foundation that makes everything else possible. When every file in your library has accurate BPM, correct key, complete metadata, and a logical name, you can focus on what matters: reading the crowd and crafting transitions that work. Whether you spend 3 hours doing it manually or 12 minutes with an automated tool, the result is the same: a library you can trust under pressure.
Try the full track preparation workflow free in GreenGo — convert, analyze, tag, and organize your first 3 tracks today.
Author: Ihor, music software developer and DJ at GreenGo