You open your DAW, you have a beat idea in your head, and then you spend 40 minutes digging through folders named "loops_final," "loops_v2," and "misc_samples" looking for that one drum loop at 128 BPM. Sound familiar? Learning to sort loops by BPM in your home studio is not a luxury. It is the difference between staying in a creative flow and losing the idea entirely. This guide walks you through exactly how to prepare, sort, sync, and manage your loop library so you spend less time searching and more time making music.
Table of Contents
- Why sorting loops by BPM matters in your home studio
- Preparing your loop library for BPM sorting
- How to sort and sync loops by BPM within your DAW
- Advanced tools and strategies for managing large loop libraries
- Executing a BPM-sorted looping workflow for digital mixing and remixing
- Why common BPM sorting advice misses the mark and what actually works
- Simplify your BPM and key tagging with GreenGo
- Frequently asked questions
Key Takeaways
| Point | Details |
|---|---|
| BPM sorting increases efficiency | Sorting loops by their BPM saves time and helps you find tempo-matched sounds faster in your home studio. |
| Verify BPM metadata | Always confirm BPM detection by ear and adjust warp markers manually to ensure loops stay in sync. |
| Use consistent naming | Include BPM and key info in filenames and folders to enable quick searching without relying solely on folder browsing. |
| Choose correct warp mode | Apply warp modes that suit loop type — beats, tones, texture, or complex — to preserve audio quality during tempo changes. |
| Combine naming with tools | Pair traditional naming strategies with visual clustering tools and batch audio taggers to manage large loop libraries effectively. |
Why Sorting Loops by BPM Matters in Your Home Studio
Every minute you spend hunting for a compatible loop is a minute your creative momentum dies. Unsorted libraries are not just inconvenient. They are productivity killers. When you cannot filter by tempo, you end up auditioning loops that are 90 BPM in a 140 BPM project, then wondering why nothing sounds right.
One of the most frustrating issues beginners hit is BPM detection errors. Your DAW reads a loop at 75 BPM when it is actually 150 BPM, a classic half-time misread. Or it tags a 140 BPM loop at 70 BPM. These sync failures in half-time are almost always detection errors, not broken loops. The fix is placing timing markers manually to force alignment. More on that in the next section.
Here is why getting your home studio BPM sorting right pays off immediately:
- Faster selection: Filter by BPM and you cut your search time from minutes to seconds.
- Cleaner mixes: Tempo-matched loops need less stretching, which means fewer audio artifacts.
- Better consistency: Your arrangements stay rhythmically tight without constant manual correction.
- Creative momentum: You stay in the zone instead of context-switching to file management.
"A disorganized sample library is not a creative problem. It is a systems problem. Fix the system and the creativity follows."
Building time-saving DJ workflows starts with this exact foundation. Now that you know why BPM sorting is essential, let's look at how to prepare your loop library for efficient sorting.
Preparing Your Loop Library for BPM Sorting
Before you sort anything, you need a structure worth sorting into. Most bedroom producers dump everything into one folder and rely on memory. That works for 50 files. It collapses at 500.
Here is a folder structure that actually scales for organizing your sample library by tempo:
- Create top-level folders by instrument type. Drums, Bass, Melodic, FX, Vocals. These are your main categories.
- Add subfolders by genre or style. Inside Drums, you might have House, Trap, Breaks, Lo-Fi.
- Add BPM range subfolders inside each genre. For example: House > 120-130bpm, House > 130-140bpm.
- Keep a "Favorites" folder at the top level for loops you reach for constantly. No digging required.
- Archive anything you never use into a separate "Archive" folder so it stops cluttering searches.
Naming your files correctly is just as important as your folder structure. Including BPM and key info in filenames lets you search by your project's tempo without opening a single folder. Use a format like this:
| Element | Example |
|---|---|
| Instrument | Kick, Pad, Bass |
| Character | Punchy, Atmospheric, Gritty |
| Key | Am, Cm, G |
| BPM | 120bpm, 140bpm |
| Full filename | Pad_Atmospheric_Cm_120bpm.wav |

Doing this manually for hundreds of files is a full day of work you do not have. This is where a batch audio tagger saves you. These tools scan your library, detect BPM and key automatically, and write that data into the file metadata and optionally the filename — all at once. Understanding how ID3 metadata works helps you see exactly which tag fields control what your DAW displays.
Pro Tip: Run a batch tag on your entire library before you reorganize folders. That way, your metadata is accurate before you start sorting, and you avoid having to re-tag after moving files.
Once your metadata is clean, tools built for DJ library management can filter, sort, and display your loops by BPM in seconds. With a well-organized library, you're ready to apply BPM sorting techniques in your DAW and workspace.
How to Sort and Sync Loops by BPM Within Your DAW
Getting loops into your DAW is one thing. Getting them to actually sit in time is another. Here is a step-by-step process for verifying and syncing loops correctly in your DAW loop tempo sync workflow.
- Check the BPM metadata first. Before you drag a loop into your session, confirm the tagged BPM matches what you hear. Play it and count the beats. If it sounds twice as fast or half as slow as expected, you have a half-time or double-time detection error.
- Correct the BPM field manually. In most DAWs, you can right-click a clip and edit its tempo. Fix it here before you do anything else.
- Place warp markers (Ableton) or flex markers (Logic) on transients. Snap these to the grid at the correct beat positions. This forces the loop to align to your session tempo, even if the original metadata was wrong.
- Choose the right warp mode for the loop type. For correct rhythmic material, use Beats mode for drums, Tones for melodic audio, Texture for pads, and Complex for full mixes. Wrong mode choices cause smearing, flanging, or metallic artifacts.
- Set your loop to follow session tempo. In most DAWs, this is called "tick-based" or "musical" time mode. It means the loop stretches or compresses automatically when you change the project BPM.
Here is a quick comparison of time-stretching approaches:
| Method | Best for | Drawback |
|---|---|---|
| Warp markers (Ableton) | Rhythmic and melodic loops | Requires manual marker placement for complex audio |
| Flex markers (Logic) | Drum loops, vocals | Can smear transients if overused |
| Beat slicing | Drum breaks | Changes the feel of the groove |
| Pitch-independent stretch | Melodic loops | CPU-heavy at extreme ratios |
Understanding ID3 metadata tagging helps here too. When BPM is stored correctly in the file's TBPM tag frame, your DAW reads it on import and skips the guesswork entirely. Tools like GreenGo and Mixed In Key both write this field automatically, though GreenGo handles the full pipeline from download to tagged file.
Pro Tip: If a loop sounds slightly off even after warp markers are placed, check whether the loop has a pickup beat or starts on beat 2. Shift your first marker one beat earlier and re-align.
Once you know how to sync loops, let's explore tools and strategies to browse and organize large loop collections visually and by similarity.
Advanced Tools and Strategies for Managing Large Loop Libraries
At some point, filename searching hits a wall. You have 3,000 drum loops and searching "kick_120bpm" returns 200 results. This is where visual browsing tools change the game.
XO by XLN Audio is a good example. It uses a 2D visual map to arrange drum samples by sonic similarity, so you can find sounds that feel alike without relying on filenames at all. You can also import your own samples alongside the included content, which means your personal library gets the same visual treatment.
Here is why sonic clustering matters for efficient loop library management:
- Reduces decision fatigue. Instead of reading filenames, you navigate by sound character. Your ears do the work.
- Surfaces sounds you forgot you had. Alphabetical browsing buries gems. Clustering puts similar sounds next to each other.
- Speeds up sound design. When you find one kick you like, the map shows you 10 more that share its character.
- Works regardless of naming consistency. Even if your filenames are a mess, the visual map still makes sense.
The best approach combines both strategies. Use BPM and key naming for fast DAW searching, and use visual clustering tools for creative exploration when you want to discover new sounds. Neither method alone covers every situation. Pair them with a batch audio tagger that writes accurate metadata into every file, and your library becomes searchable and browsable.
Pro Tip: Import your entire drum loop collection into a visual browser at the start of a session. Spend five minutes exploring the map. You will find sounds you would never have searched for by name, and that often sparks the best ideas.
After optimizing your loop management tools, let's cover practical workflows for remixing and building tracks efficiently with BPM-sorted loops.
Executing a BPM-Sorted Looping Workflow for Digital Mixing and Remixing
Here is where home studio beat sorting pays off in real time. A BPM-sorted sample library means you can go from idea to arrangement in minutes instead of hours.
Follow this workflow:
- Set your session BPM first. Decide on your target tempo before you pull in a single loop. Everything else flows from this decision.
- Filter your library by BPM range. Search for loops within ±20% of your target tempo. A 128 BPM project can comfortably use loops between roughly 103 and 154 BPM without heavy stretching artifacts.
- Start with a 2–8 bar loop as your foundation. Build tracks by copying loops and muting or deleting elements section by section. This is how you create verses, choruses, and drops quickly.
- Copy and paste your loop across the timeline. Then start removing elements in certain sections. Mute the bass in the intro. Drop the drums in the breakdown. Add a new melodic loop in the chorus.
- Verify sync with warp markers at each new loop drop-in. Do not assume a new loop is in time just because its BPM tag matches. Always confirm visually on the grid.
Pro Tip: Keep a text file or sticky note next to your monitor with your current session BPM, key, and the names of your three core loops. When you are deep in a session, this saves you from constantly checking your DAW and breaking focus.
This approach also applies directly to open-format DJ set prep, where you need to move between tempos and styles quickly. BPM-sorted loops make transitions smoother and more musical. If you're working with tracks from online sources, the import-to-DJ-software pipeline gets your raw downloads tagged and tempo-sorted before they ever touch your DAW.
Why Common BPM Sorting Advice Misses the Mark and What Actually Works
Most guides tell you to sort by BPM and call it done. That advice is incomplete. BPM metadata is only as reliable as the tool that wrote it, and most tools get it wrong on complex material.
The real lesson: BPM metadata is fallible, and confirming with manual marker placement is the most reliable way to trust your loop's groove. Treat BPM tags as a starting point, not a guarantee. Your ears are the final authority.
Here is what most sorting guides also miss. Drum loops and melodic loops should live in completely separate folders, not just different subfolders. Why? Because drum loops need Beats warp mode and melodic loops need Tones or Complex mode. When they are mixed together, you end up constantly switching modes and making mistakes. Keep them apart from the start.
Another overlooked point: key sorting matters as much as BPM sorting for melodic loops. A loop at the right tempo but the wrong key sounds wrong immediately. Sorting melodic loops by both BPM and key, using a format like Cm_128bpm, means you can filter for both simultaneously. Understanding what key lock means for DJs helps you see why maintaining the original key during tempo changes is critical for clean mixes.
The producers who work fastest are not the ones with the biggest libraries. They are the ones with the most organized 500-loop collection. Combine tempo-key naming with a visual clustering tool and a DJ library management tool that handles batch BPM tagging for samples, and you have a system that is fast, repeatable, and actually enjoyable to use. Perfection is not the goal. A pragmatic, repeatable workflow is.
Simplify Your BPM and Key Tagging with GreenGo
Getting your loop library sorted by BPM is the goal. Getting there without spending hours on manual tagging is the real win.
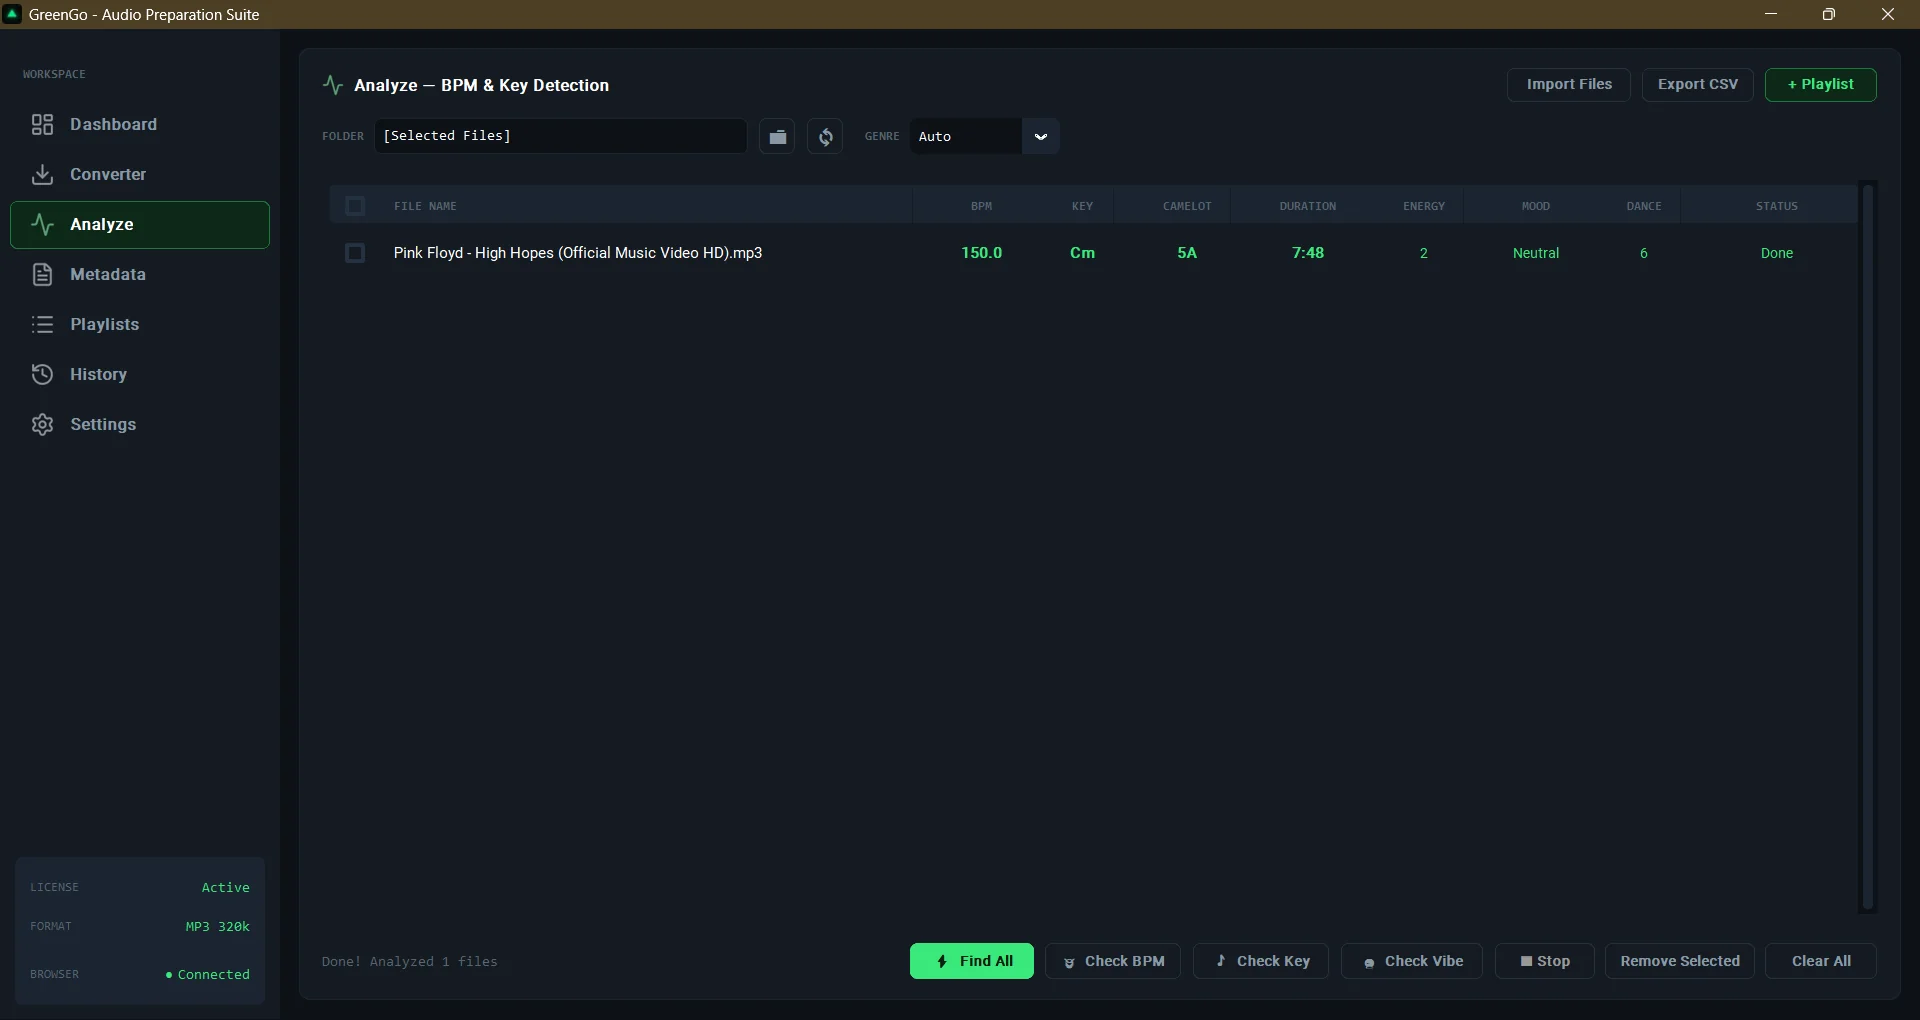
GreenGo automatically detects BPM and musical key for your audio files, then writes that data directly into your file metadata in bulk. No manual entry. No guessing. You drag in your loops, GreenGo analyzes them, and your library comes out tagged, searchable, and ready for any DAW or DJ software including Rekordbox, Serato, Traktor, and VirtualDJ. It supports batch processing, cloud import, and format conversion, so your entire home studio sample library gets consistent, accurate metadata in one pass. Check the GreenGo FAQ to see exactly how it fits your setup.
Frequently Asked Questions
How can I fix a loop that sounds off tempo in my DAW?
Check if your DAW detected the BPM at half or double time; manually correct the BPM field and place warp or flex markers at key beats to align the loop properly.
Why should I include BPM and key information in filenames?
Including BPM and key info in filenames lets you search and sort loops by your project tempo instantly, cutting down the time it takes to find the right sound.
What are the benefits of visual sample browsing tools like XO?
Tools like XO use a 2D visual map to arrange drum samples by sonic similarity, making large libraries faster to navigate even when filenames are inconsistent or missing.
How do I minimize audio artifacts when stretching loops to fit my project tempo?
Use loops within ±20% of your target BPM and select the correct warp mode for your loop type to preserve transient integrity and keep the sound clean.
Recommended
- What Does Key Lock Mean for DJs? Harmonic Mixing Explained | GreenGo
- 5 Time-Saving DJ Workflows Every Beginner Should Know | GreenGo
- Open-Format DJ Set Prep: How to Prep 50 Tracks in Under 30 Minutes | GreenGo
- 5 Best DJ Library Management Tools in 2026 (Honest Comparison) | GreenGo
- GreenGo — BPM & Key Detection Tool for DJs | Auto-Import, Tag & Organize